Tuesday, December 28, 2021

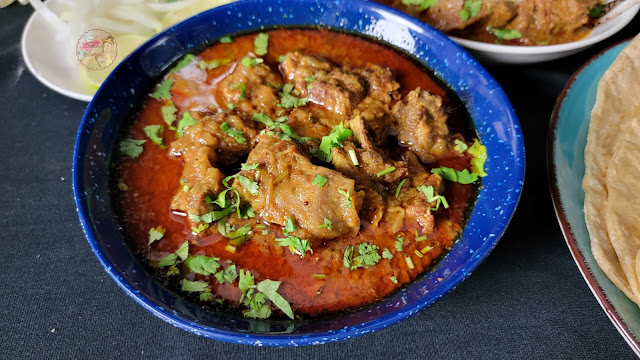
How to Make Restaurant Style Mutton Curry in One Pot 

Hello Foodies,

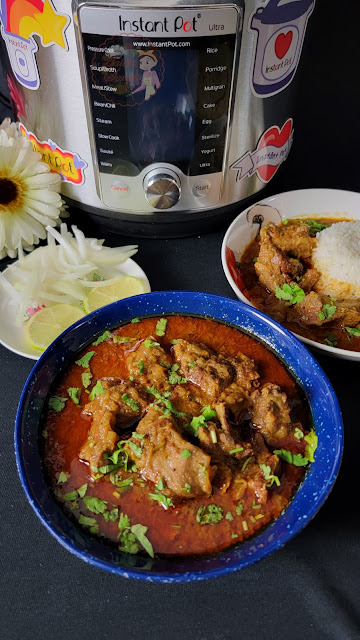
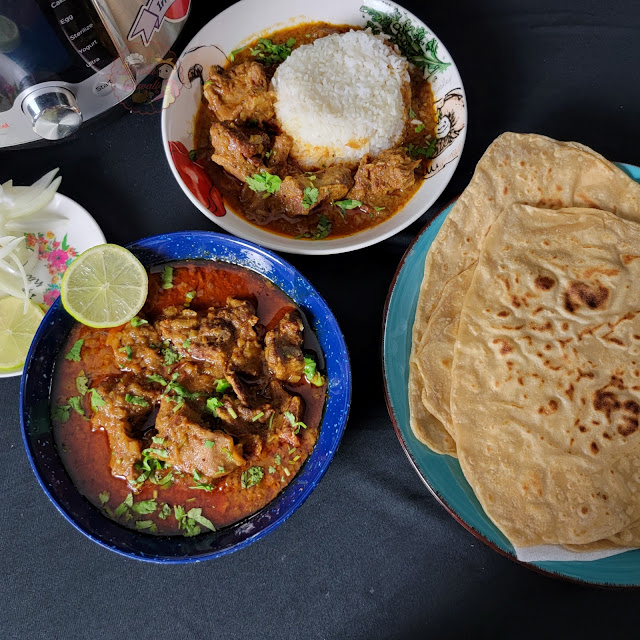
          Tender, succulent pieces of goat meat are cooked in a spicy and flavorful gravy that makes it the perfect bowl of comfort food with Wheat Parathas and steamed rice. Mutton often refers to goat meat instead of sheep/lamb.

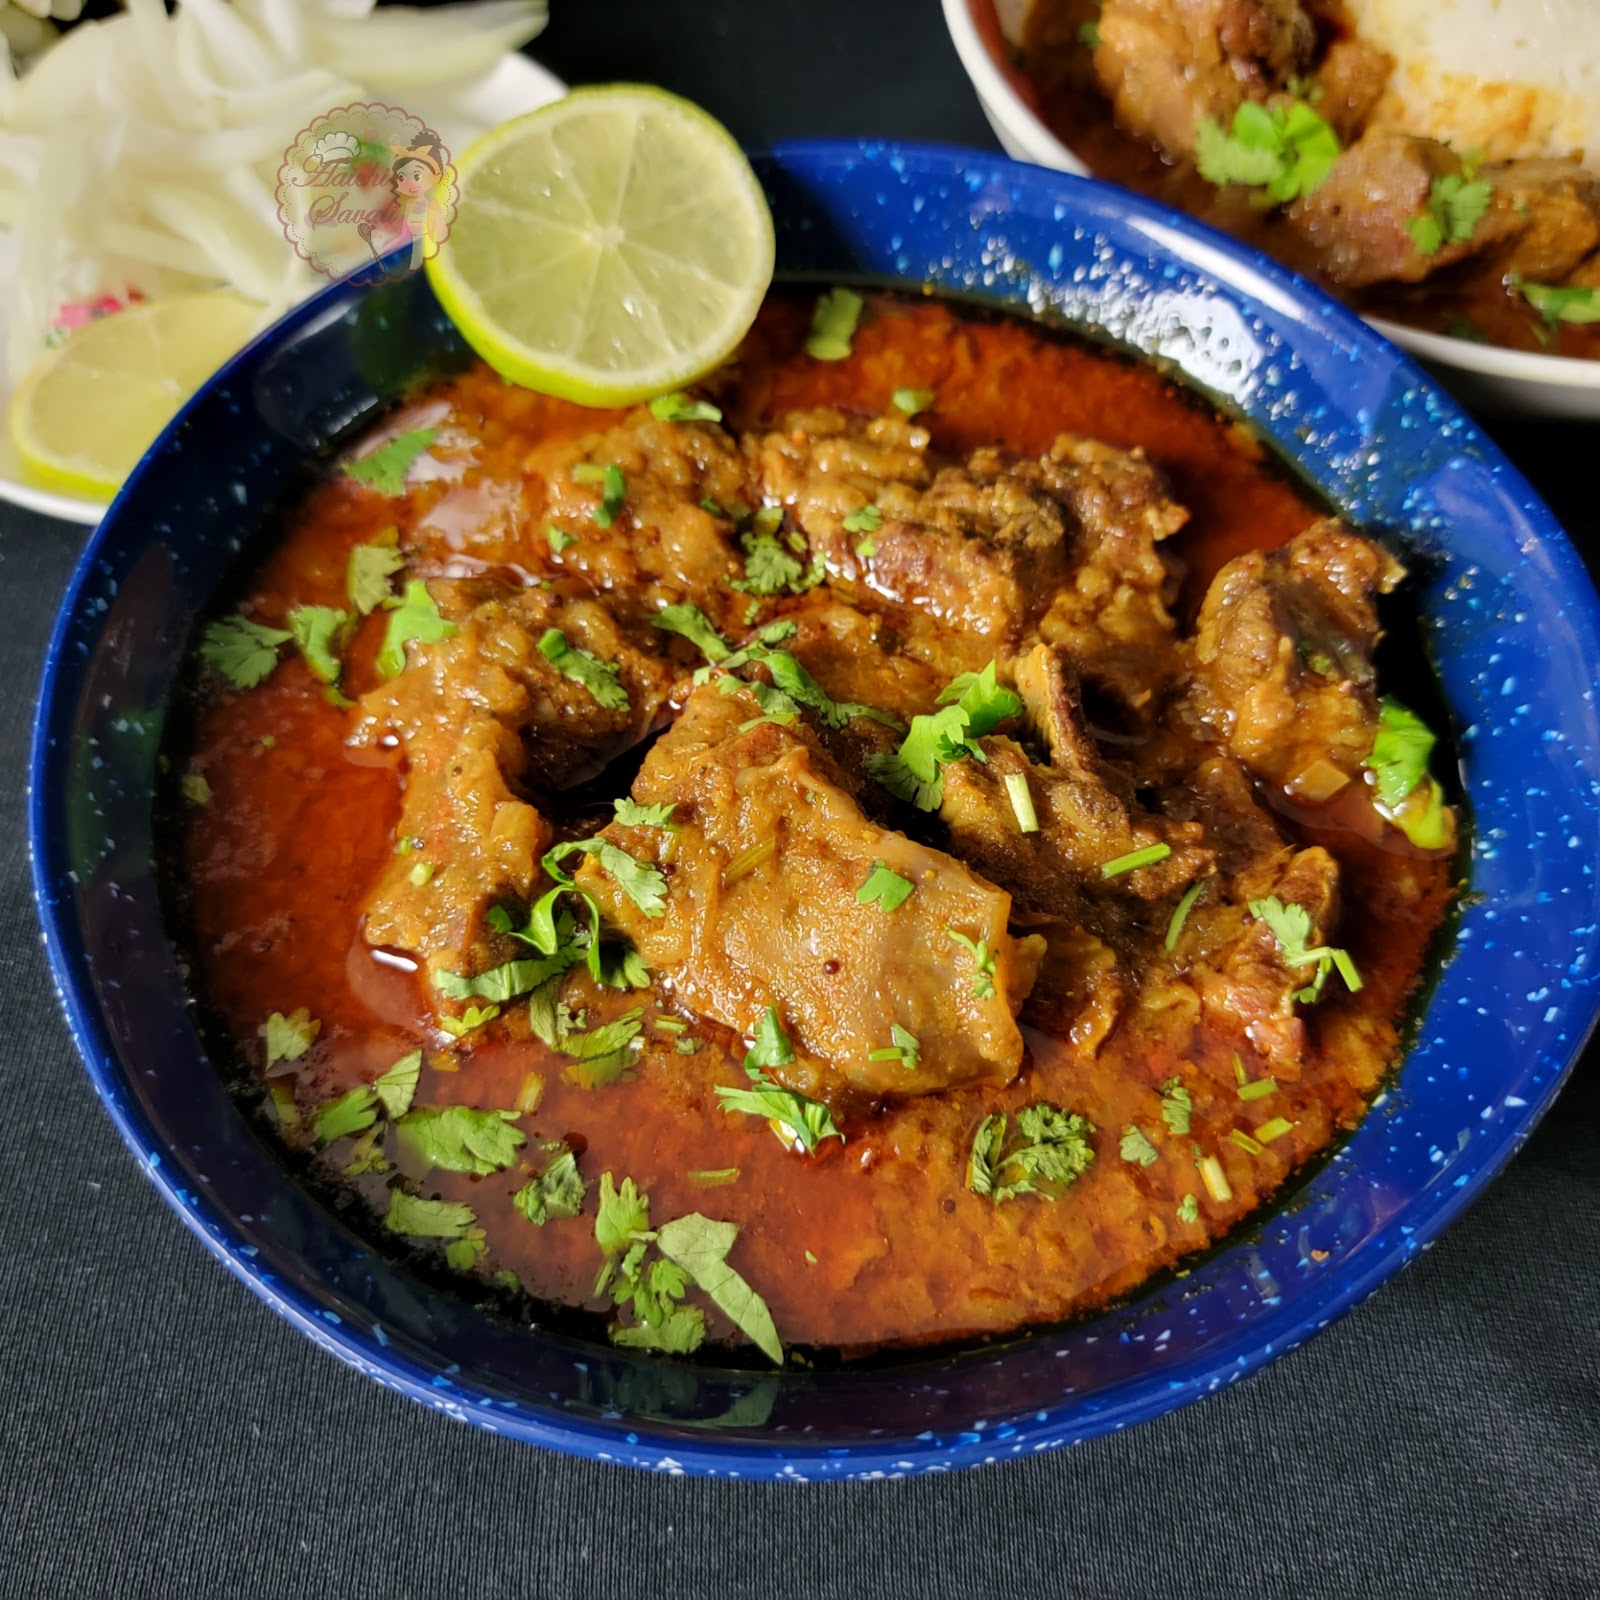
            This simple yet delicious version of mutton or goat curry is also easy to put together. You should definitely try this one-pot mutton curry at home. So easy to make with minimal prep.

Video Recipe:

What Does Goat Curry Taste Like?

The flavor is quite appealing, goat meat cooked properly the meat is succulent tender, and rich. Goat has a similar flavor to lamb but is not as lean, making it a bit richer. Goat curries can vary in flavor from very spicy to mild, but all have a savory sauce featuring a mix of aromatics and spices.

Whether you just started using this instant pot or you’ve been at it for a while, these tips will help you with your next Instant Pot cooking:

  • Small pieces of meat cook through much faster than the whole/big, so adjust the time accordingly and insurance that the meat won’t be overcooked or dry.
  • You will get juicy, irresistibly delicious meat in the instant pot.
  • Season meat with your favorite spice blend.
  • A natural release keeps the meat moist, and it also continues the cooking process, so NPR for at least 10 minutes.
  • Adjust cook time based on the size/weight of the meat used.
  • Don’t throw away the cooking liquid at the end. Use it as a stock for stews, soups, etc.

Preparation Time: 15 Minutes; Cooking Time: 15 Minutes. 
Each Serving of Mutton Curry contains 241 cal.

Ingredients:

  • Goat Meat/Mutton, cut pieces with bones 1 lb
  • Oil 1 Tsp
  • Cumin-Mustard Seeds 1 Tsp
  • Onion, finely chopped 250 g
  • Ginger-Garlic Paste 1 Tbsp
  • Red Chilli Powder 1 Tbsp
  • Turmeric Powder 1 Tsp
  • Coriander Powder 1 Tsp
  • Cumin Powder 1 Tsp
  • Salt to taste
  • Kanda Lasun Masala 1 Tbsp
  • Tomato 1, sliced
  • Coriander Leaves, chopped for garnishing

Instructions:

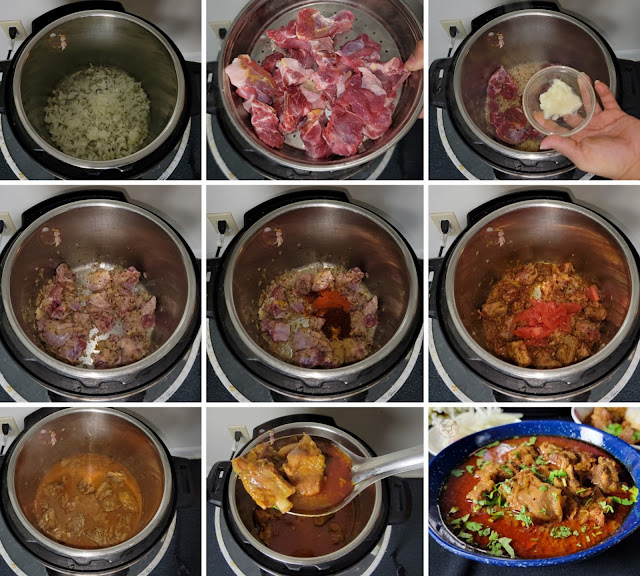
  • Turn on the saute mode of the instant pot and heat oil. 
  • Add onions and saute and cook fie 3-4 minutes or until it becomes light brown color. 
  • Now, add goat meat pieces, ginger garlic paste, and stir all well. 
  • Saute and cook for 2-3 minutes.
  • Now add red chili powder, turmeric, coriander-cumin powder, salt, and Kanda Lasun powder(if you cant find Kanda lasun powder, then you can use garam masala instead of Kanda lasun powder).
  • Mix everything well and add sliced tomatoes.
  • Now add 1 cup of water and deglaze the pot. 
  • Close the lid of the instant pot and place the vent in the sealing position.
  • Pressure Cook on manual mode(Hi) for 8 minutes. 
  • NPR for 10 minutes and then release the remaining pressure manually and open the lid. 
  • Mix well and perfectly cooked, juicy, and tender mutton curry is ready to serve. 
  • Garnish with chopped coriander leaves and serve hot with Triangle Parathas and Steamed Rice. Enjoy!!! 

Some More Instant Pot Recipes to Try:

Tips:

  • You can also use mustard oil as the base of this mutton curry for an authentic taste.
  • Nicely fry the onion until they are browned. The color of the onion will determine the final color of your mutton curry.

Dietary Comment:

  • The calorie count is based on a 2000 calorie diet.
  • Per serving contains 241 calories, along with 8.6 g carbohydrates, 2.3 g dietary fiber, 8.3 g fats, and 32.4 g protein.
  • Portion size can always be increased or decreased depending on your health goals and activity level.

Good Time To Eat:

           It is good to eat Mutton Curry for lunch and dinner.

  • If you make this recipe, share your food picture with hashtag #aaichisavali on Instagram and Facebook, so everyone can enjoy it too! 
  • Subscribe to my YouTube channel for Healthy, Tasty, Instant Pot, and Air fryer recipes.
  • I love it when you try my recipes and send me pictures & feedback.

Eat Healthy, Stay Healthy!!!

Friday, November 26, 2021

How to Dehydrate and Store Coriander Leaves/Cilantro in an Air Fryer

Hello Foodies,

         The cheap and easy way to make your own supply of dried coriander leaves using an air fryer. Dried cilantro is easy to keep on hand, and its flavor is a sure-fire way to make a dish from okay to incredible.

           Dried coriander leaves are also great in seasoned butter for roast chicken, steeped in syrup and tossed with berries, and mixed into yogurt for a refreshing condiment. If tossing dried herbs directly into a dish, Do rub them between your palms first. This releases the essential oils in the dried herbs.

Video Recipe:

Do try a quick saute of the dried coriander in oil, as this will release more flavor. Try mixing these cilantro flakes with rice and lime juice for a quick and easy way to spice up rice.

Ingredients:

  • Coriander Leaves 1 Bunch

Instructions:

To Dehydrate/Dry Coriander Leaves in an Air Fryer:

  • Preheat Air Fryer at 360 F for 2 Minutes.
  • Wash the coriander leaves thoroughly under the tap water.
  • Spin dry the coriander leaves using a salad spinner.
  • Place the coriander leaves out on a pan lined with a paper towel. 
  • Pat dry or blot as much moisture of the coriander leaves as possible.
  • Pluck / Remove the stems from the coriander leaves.
  • Place the pat dried coriander leaves in the Air Fryer’s basket.
  • Now, cover the coriander leaves with a rack or place a trivet over the coriander leaves(coriander leaves didn’t fly in the air fryer as I have placed trivet over it).
  • Air Fry for 2 minutes at 360 F.
  • Shake/Stir the coriander leaves after 1 minute.
  • Now, Air fry at 390 F for 1 minute.
  • Once done, move the coriander leaves to a bowl to allow them to cool completely.
  • Let it cool completely before storing, crushing. 
  • Once done, gently crumble/crush the coriander leaves in between palms(Remove any pieces of the dried stems you find).
  • Store dehydrated coriander leaves in an airtight container and whenever need, use it in recipes. Enjoy!!!

To Dehydrate/Dry Coriander in the Oven:

  • Preheat oven at 300 F(use the lowest temperature of your oven)
  • Spread the coriander in an even layer over a baking pan lined with parchment paper.
  • Bake at 300°F for 5-10 minutes. 
  • Stop stirring every two minutes.

To Dehydrate/Dry Coriander in the Microwave:

  • Lay the Coriander in a single layer on a paper towel, either on the oven rack or on a microwave-safe plate.
  • Cover the leaves with another paper towel.
  • Microwave on high for 2-3 minutes, stopping to stir after every 20 to 30 seconds.
  • However, the Coriander didn't crispen as an air fryer. 
  • Microwaves differ in power output, so you'll have to experiment.

How to use Dehydrated Coriander?

  • Use fresh herbs at the end or as a garnish to brighten up a dish.
  • Use to garnish pasta, pulao, rice.
  • Sprinkle on toasted bread with a little butter.
  • Sprinkle in casseroles, stews, or soups.
  • Add to other herbs to make spice blends like Italian Herb Blend
  • Dried herbs have a more intense flavor than their fresh counterpart, so you'll want to use them during the long cooking process. 
  • Garnish the salads, salsas, Kadhi, or chaas with it.
  • Add coriander to pesto sauce to add more texture to its green color.
  • Combine chopped coriander, garlic, and lemon juice, and use it as a rub for chicken, lamb, and fish.
  • Serve a colorful veggies salad garnished with coriander leaves.
  • Dried coriander can be sprinkled on a host of different recipes, including salads, vegetable sautés, and grilled fish.

How to Store Dried Coriander?

  • Store dried coriander in airtight containers or in glass containers, or mason jars.
  • Keep your jars in a cool, dark place, store dried coriander away from heat.
  • Dried coriander keeps for a year. You can use it as you would fresh ones.
  • You can still use them after a year but they will not be as aromatic.
  • Do store your dried herbs away from heat, light, and moisture.

Here are some Cooking 101 Posts:

Dietary Comment:

  • The calorie count is based on a 2000 calorie diet.
  • Per serving(25 g) contains 6 calories, 1 g carbohydrates, 0.1 g fats, and 0.5 g protein.
  • Portion size can always be increased or decreased depending on your health goals and activity level.
  • (Please keep in mind that the nutritional information is calculated using a nutrition facts calculator. It is a rough estimate and can vary significantly based on products used.)

Health Benefits of Coriander/Cilantro:

  • Coriander is a remarkable heavy-metal detoxifier.
  • It contains antifungal properties, anti-inflammatory properties, and anti-septic properties.
  • Coriander lowers bad cholesterol (LDL) and increases the levels of good cholesterol (HDL).
  • Coriander contains high amounts of iron, which is essential for curing anemia.
  • Prevents urinary tract infections.
  • It helps settle digestive upset.

  • If you make this recipe, share your food picture with hashtag #aaichisavali on Instagram and Facebook so that everyone can enjoy it too! 
  • Subscribe to my YouTube channel for Healthy, Tasty, Instant Pot, and Air fryer recipes.
  • I love it when you try my recipes and send me pictures & feedback.

Eat Healthy, Stay Healthy!!!

Sunday, November 21, 2021

 How to Decorate Rasmalai Sheet Cake

Hello Foodies,

         You get the BEST of both worlds with this cake! It is so much better than that dried, sweetened sheet cake you find in the bakeries! 

This Rasmalai Sheet Cake is easy to make and is loaded with delicious Rasmalai flavor! This cake is the perfect party dessert, it’s extra moist with a simple and delicious whipping cream frosting. You are going to go crazy for them.

Video Tutorial:

Easily made from scratch, this crowd favorite dessert practically melts in your mouth. This recipe is perfect for feeding a large group of friends and family at your next party, picnic, or potluck.

Some More Cakes Recipes to Try:

  • If you make this recipe, share your food picture with the hashtag #aaichisavali on Instagram and Facebook so that everyone can enjoy it too! 
  • Subscribe to my YouTube channel for Healthy, Tasty, Instant Pot, and Air fryer recipes.
  • I love it when you try my recipes and send me pictures & feedback.

Eat Healthy, Stay Healthy!!!

Thursday, November 18, 2021

How to Make Banana Chips in an Air Fryer

Hello Foodies,

         These air fryer banana chips are so crispy, crunchy, and perfect as a snack or side for lunch. This recipe is going to find its way into your weekly rotation. Instead of buying fatty, preservative-heavy chips from the grocery store, you can whip up a batch of homemade whenever a craving hits.

           Also, these banana chips are good tea time snacks or any time when you want to munch something while reading a book or enjoying the monsoon rains. These Banana chips can also be had in fasting or Vrat. You can make a big batch and store it in an air-tight container. These are air-fried, so obviously they are healthy with fewer calories.

Video Recipe: 

Making air fryer banana chips only requires a handful of wholesome ingredients and a few simple steps. The best part? You’ll have so much fun customizing the seasoning. Let’s get started!

These Banana Chips are:

  • Crunchy and Crispy
  • Simple and Flavorful
  • Vegan and Gluten-Free
  • Easy to Make
  • Non-deep Fried
  • Healthy and Perfect for snacking!

Why do you soak banana slices in water before air frying?

  • Soaking banana slices before frying them draws out the natural starch in banana slices and gives them that great crunch. It also helps prevent them from sticking to each other in the air fryer’s basket.
Preparation Time: 15 Minutes; Cooking Time: 10 Minutes.
Each Serving of Banana Chips Contains 138 Cal.

Ingredients:

  • 4-5 Raw Banana / Plantain / Green Banana
  • 1 Tsp Salt
  • ½ Tsp Turmeric
  • 4-5 Cups Water
  • 1 Tsp coconut oil 
  • Red chili powder and salt for seasoning

Instructions:

To Wash and Prepare Raw Banana to Air Fry:

  • In a bowl, pour 4-5 cups of water, 1 tsp salt, and ½ Tsp turmeric.
  • Mix well and keep aside.
  • Meanwhile, peel off the skin of the raw banana completely(wear gloves or grease the hands with oil to avoid being sticky).
  • Using a sharp knife or mandolin slicer, cut peeled bananas into thin slices.
  • Place the banana slices in turmeric water to remove excess starch(Soak the bananas for around 5-10 minutes.). 
  • Drain the water from the banana slices with a colander. 
  • Using paper towels, pat the bananas dry of any excess moisture.

To Air Fry Banana Chips:

  • Preheat the air fryer to 360 F for 3 minutes.
  • Grease the air fryer’s basket with coconut oil.
  • Place banana slices into the air fryer basket in one or two layers.
  • Make sure you leave a little space between each slice(you will need to do multiple batches).
  • Once the slices are placed in a single layer and spray some coconut oil.
  • Air fry at 360 F for about 10 minutes.
  • If they need additional time, leave them in for another few minutes. 
  • If some are crisp and ready, remove them and continue cooking the rest.
  • Then, repeat the process until all slices are cooked.
  • Sprinkle some red chili powder and salt over the top, if you like, and mix well.
  • Remove the banana chips from the air fryer and place them into a large bowl. 
  • Allow the banana/plantain chips to cool to room temperature. Enjoy!!!

To deep-fry/Oil fry the banana chips:

  • In a Kadhai heat coconut oil.
  • Once the oil becomes hot, spread and drop the banana slices into the oil to avoid sticking from each other.
  • Stir and fry on medium flame.
  • Fry until it turns crisp yet not turn golden brown.
  • Once done drain off the banana chips over kitchen paper to remove excess oil.
  • Season with your favorite seasonings. Enjoy!!!

To oven bake the banana chips:

  • Preheat the oven to 400 degrees F.
  • Place the banana slices on the oil grease baking tray or sheets.
  • Place the baking pan in the preheated oven.
  • Bake banana chips at 400 F for 15-20 minutes. 
  • After 8-9 minutes, turn the chips over and continue baking.
  • You’ll know the banana chips are done when they start to brown around the edges. 
  • Once done remove the pan from the oven.
  • Season with your favorite seasoning. Enjoy!!!

Why are my air-fryer chips soggy?

  • Because air-fryer temperatures vary, so do cook times. You may need to cook your chips a little longer than suggested. If your air-fryer chips are soggy, throw them back into the air fryer to cook a little more. Start checking the food in the shortest time and check back a little later if it’s not done.

Here are some more Air Fryer Recipes to Try:

Tips:

  • Make sure you peel the bananas before slicing them.
  • You don’t need to throw the peels of banana, you can make a curry/sabzi with them.
  • Adjust the air frying/cooking time depending on the thickness.
  • Drop banana slices into the turmeric water after slicing, as it changes color to black.
  • For the authentic flavor of banana chips, use coconut oil.
  • While air frying, don’t add too much of the slices and don’t overcrowd. The slices stick to each other and don’t become crisp. So you have to air fry in batches.
  • I have seasoned the banana chips with red chili powder and salt. Though you can use your own choice of herbs and spices.
  • Brush on a thin layer of coconut oil before baking or air frying for added flavor.
  • Slice them thinner for faster cooking and crispier chips.
  • For longer chips, slice the fruit lengthwise.

Seasoning options or flavor variations for Banana Chips: Have fun and experiment with different seasonings.

  • Regular/Plain: Season with salt and turmeric
  • Chili-lime Seasoning: Toss the chips with lime juice, chili powder, and salt.
  • Salt and Black Pepper.
  • Garlic-Onion Seasoning: Season with curry powder, garlic, onion, and salt.
  • BBQ Seasoning.

Banana Chips Serving Options:

  • Serve air fryer banana chips as a snack all on their own for your next movie night. 
  • Pack them in school lunch boxes. 
  • If planning to serve with the dinner, pair them with some jackfruit burger/chicken burger. If planning to serve with dip, whip up with a batch of guacamole or hummus.

How to store the Banana chips?

  • Store banana chips in an airtight container for up to about 3-4 weeks.

Dietary Comment:

  • The calorie count is based on a 2000 calorie diet.
  • Per serving contains 138 calories, 29 g carbohydrates, 3.4 g Dietary Fiber, 2 g fats, and 1.4 g protein.
  • Portion size can always be increased or decreased depending on your health goals and activity level.
  • (Please keep in mind that the nutritional information is calculated using a nutrition facts calculator. It is a rough estimate and can vary significantly based on the products used).

Good Time To Eat:

           It is good to eat Banana chips as snacks.

  • If you make this recipe, share your food picture with hashtag #aaichisavali on Instagram and Facebook so that everyone can enjoy it too! 
  • Subscribe to my YouTube channel for Healthy, Tasty, Instant Pot, and Air fryer recipes.
  • I love it when you try my recipes and send me pictures & feedback.

Eat Healthy, Stay Healthy!!!

Friday, November 12, 2021

How to Make Mushroom Corn Rice in the Pressure Cooker

Hello Foodies,

         The goodness of sweet corn coupled with mushrooms, basmati rice, and some flavorful spices. A low-fat alternative, the fresh flavors of sweet corn, mushrooms, onion, and spices will get you hooked! Here’s a mostly hands-off, weeknight-friendly recipe for mushroom rice, full of flavor.

Mushroom Corn Rice - A classic combination of mushroom and corn cooked with butter and flavorful Basmati rice that gives the yummy flavor to this dish. It is perfect for lunch boxes. For kids and adults alike. Add a side of yogurt, pickle, papad, and fruit. All set!

Video Recipe:

I keep repeating this dish very often, as mushroom and corn have such unique textures and flavors. The protein content in mushrooms and the fiber in corn make it a 'Superfood'. This is such a versatile and easy one-pot meal recipe. I’ve used mushrooms, corn. You can add other vegetables like potatoes, carrots, cauliflower, broccoli, and more. You can mix in scrambled eggs or use boneless chicken along with the vegetables for added protein. So many possibilities!

We love Instant Pot Mushroom Corn Rice Because It’s-

  • Gluten-free, soy-free, and nut-free recipe.
  • Ready in less than 20 Minutes.
  • It is the perfect one-pot meal.
  • It is easy to make and so flavorful.
  • It is the perfect, non-sticky Rice recipe.

Which Basmati Rice do I use?

          I recommend using good quality Basmati Rice/Long Grain Jasmine Rice. I have used Tilda / Royal / Daawat’s extra-long Basmati Rice which are the best brands. Every variety of rice comes out perfect and smells amazing! Aged basmati rice works very well when making pulao, or biryani. 

Preparation and Cooking Time: 20 Minutes.
Each Serving of Mushroom Corn Rice Contains 234 Cal.

Ingredients:

  • 1 Cup Basmati Rice
  • 1 Cup Mushrooms
  • ½ Cup Sweetcorn
  • 1 Small Onion, chopped
  • 3 Green Chilies
  • 3 Cloves Garlic, Minced
  • 1 Tsp Cumin seeds
  • 1 Bay Leaf
  • 1 Tsp Black Pepper Powder 
  • 1 Tsp Garam Masala
  • Salt to taste
  • 1 Tbsp Butter
  • 1 ½ Cups Water/Veg.stock
  • Spring Onion and lemon wedges for garnishing

Instructions:

  • Rinse the Basmati Rice at least 3-4 times or under the tap water until the water runs perfectly clear.
  • Soak Rice in water for 15-20 minutes(Rinsing and Soaking helps get rid of starch and starch can make your rice sticky).
  • Turn on the sauté mode of the Instant Pot and heat butter.
  • Splutter cumin seeds and add bay leaf. 
  • Now, add chopped onion, green chilies, and garlic.
  • Saute and cook for 2-3 minutes or until onions become translucent.
  • Add sweetcorn, mushrooms, rice, black pepper powder, garam masala, salt, and mix well.
  • Add veg. stock/water 1 ½ cups, mix all well and deglaze the pot.
  • Close the lid and place the vent in the sealing position.
  • Cook on manual mode(Hi) for 6 minutes.
  • Natural release the pressure for 10 minutes and then release the remaining pressure manually.
  • Now, open the lid and using a fork fluff the rice.
  • Healthy, flavorsome mushroom corn rice is ready to serve. 
  • Squeeze some lemon juice and enjoy a one-pot meal!!!

Dietary Comment:

  • The calorie count is based on a 2000 calorie diet.
  • Per serving contains 234 calories, along with 44.7 g carbohydrates, 3.9 g fats, and 6 g protein.
  • Portion size can always be increased or decreased depending on your health goals and activity level.

Some More One-Pot Rice Recipes to Try:

Tips to Make Mushroom Corn Rice:

  • Use any type of mushrooms you want. I used normal button mushrooms, but you use Swiss Brown / Cremini mushrooms. 
  • Don't slice mushrooms too thin.
  • Basmati and jasmine are great here, it comes out nice and fluffy like long grain rice. 
  • I find that medium and short-grain rice is a bit sticky for my taste when cooked in pulao style.
  • I have used fresh sweetcorn, but you can use frozen sweetcorn too.

Good Time To Eat:

           It is good to eat Mushroom Corn Rice for lunch, brunch, or for dinner.

  • If you make this recipe, share your food picture with hashtag #aaichisavali on Instagram and Facebook, so everyone can enjoy it too! 
  • Subscribe to my YouTube channel for Healthy, Tasty, Instant Pot, and Air fryer recipes.
  • I love it when you try my recipes and send me pictures & feedback.

Eat Healthy, Stay Healthy!!!

Tuesday, November 2, 2021

Hello Foodies,

        Happy Diwali to Everyone! Deepavali or Diwali festival of light! And it is one of my favorite Hindu festivals. It’s particularly associated with Lakshmi, the Goddess of Wealth & Prosperity, and marks the beginning of the financial year. Prepare a festive meal, making sweets, snacks, and savories are a tradition for Diwali. It is the biggest and the brightest of all festivals. So get ready to prepare some tasty festive treats!

A celebration of prosperity, Diwali gives us the strength and the zeal to carry on with our work and goodwill for the rest of the year and thus, promising us success and prosperity. Here is my Diwali Faral(Sweet and Savory Snacks)Platter.

Besan Ladoos:

This year's Diwali try to make healthy homemade snacks. I'm talking about chakli, chivda, ladoos, shakkarpara, and more favorite Diwali snacks. So, I have started Diwali special recipe series with this sugar-free three ingredients besan ladoos. These besan ladoos are Dr.K's(my husband) favorite ones. So I have started Diwali preparation with these besan ladoos.

Rose-Malai Ladoos:

Gorging into this soft, sweet, and creamy delights Rose Malai Ladoo is exactly how we define pure love. So this Diwali makes delightful Rose-Malai Ladoos. They are easy to make and prepared from scratch using fresh ingredients. Ladoos are a quintessential Indian sweet savored at every festival.

Rava Coconut Ladoo | रवा नारळ लाडु:

The rich flavor of roasted rava and fresh coconut and the intense aroma of cardamom powder made this Rava-Coconut Ladoo very special and that nobody can resist. Any celebration is incomplete without sweet so here's this mouth-watering, aromatic and delightful Rava-Coconut Laddu recipe.

Motichoor Boondi Ladoos:

Indian festivals, puja, weddings, or any celebration is incomplete without these motichoor/boondi ladoos. Motichoor ladoos prepared from chickpeas or gram flour are tiny droplets of flour that are fried, later immersed in thick sugar syrup, and finally shaped liked ladoos.

Shankarpali / शंकरपाळी / Shakkarpara:

Shankarpali is a sweet snack that is traditionally enjoyed amongst the Maharashtrian and Gujarati community in India as a treat at the Diwali festival and has a long shelf-life too.

Bhajanichi Chakali / Multigrain Flour Chakali:

Maharashtrian style bhajanichi chakli without which Diwali cannot be celebrated. Chakali can be prepared in different ways like Rice flour chakli, wheat flour chakali, moong dal chakali, jowar flour chakli, etc. This chakali is prepared using chakali chi bhajani.

Some more Diwali Recipes to Try:

Sunday, October 17, 2021

How to Make Soft and Healthy Triangular Rotis/Parathas

Hello Foodies,

          A signature paratha made with a combination of whole wheat flour, salt, oil, and water to a wholesome meal. These traditional flatbreads are a staple in the Indian subcontinent. The best thing about these parathas is that they are easy to make and require no special skills like the stuffed parathas. These can be made ahead and stored in the refrigerator for several days or even frozen.

        To make parathas soft, and flaky the dough should be soft and pliable. The dough is then rolled into layered and cooked on a hot tawa with some oil until light golden brown spots appear on both sides. These parathas are easy to make and come out super flaky. This recipe has no eggs and no dairy so it is totally vegan and healthy. These parathas keep well without drying up after making. Serve your favorite curry with100% wholewheat paratha that makes it a very healthy option for your lunch or dinner. 

Video Recipe:

           Whole Wheat Paratha is a great source of good fibers and nutrients, making it a wonderful alternative for all weight watchers. Rich in taste and fresh to the core, the crisp paratha is a perfect breakfast item that gives your day a healthy start. Layered with perfection, the delicious paratha can also be eaten as a snack and helps you keep fulfilled and energized all day long.

Preparation Time: 10 Minutes; Rolling and Cooking Time: 10 Minutes.
Each Whole Wheat Paratha Contains 123 Calories.

Ingredients:

  • 3 cups Whole Wheat Flour
  • 2 Tsp Oil
  • 1 Tsp Salt
  • 1 ½ Cups Water
  • Flour for rolling the paratha

Instructions:

To Knead the Dough:

  • Sieve the whole wheat flour(the most important step).
  • Use the dough hook attachment of the kitchen aid and keep it ready and set the bowl of the kitchen aid machine in position.
  • In a mixer bowl add whole wheat flour, salt, 1 tsp oil, and water 1 cup.
  • Now, lock the hook knob and start the mixer at speed 2 first and keep alternating between speed 2 and speed 4 as the dough starts forming.
  • Stop the mixer and scrape the dry flour from the sides of the bowls using a spatula.
  • Start the mixer and add the remaining ¼ cup of water slowly, 2 Tbsp at a time in the bowl. 
  • Now, add oil to make the dough less sticky and keep mixing at low speed until dough forms.
  • Cover and rest the dough for 10 minutes in a bowl, and after 10 minutes, the dough is ready to make the parathas.

To Roll Triangle Paratha:

  • Take one piece of the dough ball and roll it using the dry flour. 
  • Using a rolling pin, roll the dough into a  5-6” circle. 
  • Drizzle the surface with a few drops of oil, spread it evenly with the fingers. 
  • Now, sprinkle some flour.
  • Fold the circle in half so that the oil is on the inside.
  • Drizzle the surface with a few drops of oil, spread it evenly with the fingers, and sprinkle the flour. 
  • Fold the semicircle in half again to form a triangle shape.
  • Dip the dough in the dry flour and generously coat both sides. 
  • Roll the dough back and forth with the rolling pin to maintain the triangle shape. 

To Cook/Roast the Triangle Paratha:

  • Heat a tawa/griddle over medium-high heat. 
  • Once the tawa is hot, place the rolled-out paratha on the tawa and cook until the bottom of the paratha turns lighter about 1 minute. 
  • Using a spatula, flip the paratha and top with few drops of oil. 
  • Cook the second side until it turns light brown, about 2 minutes.
  • Flip the paratha and top with oil, spreading it evenly over the surface.
  • Gently press the paratha with the spatula to help the paratha cook evenly and puffed up.
  • Once both sides are cooked well and become golden brown that means it's done.
  • Transfer the paratha to a plate. 
  • Repeat the same procedure with the remaining dough.
  • Here, healthy, soft, and flaky parathas are ready to serve.
  • Serve hot with curry, pickle, or yogurt. Enjoy!!!

How to store the dough?

  • The dough can be refrigerated in an air-tight container for up to 3 days.
  • When using refrigerated dough, allow the dough to come to room temperature before rolling.

How to store and reheat the parathas?

  • Cooked Parathas can be refrigerated for 3 to 4 days or frozen for a month for longer shelf life. Reheat the Parathas on the stovetop griddle/microwave for 30-45 seconds.
How to keep paratha Soft?

  • Place a cloth or kitchen paper napkin in a casserole, stack them and keep them covered.
  • Do not roast them on a low flame, roasting on a low flame will harden them.

How to make extra crispy paratha?

  • Simply fry them for a bit longer on each side to get more brown crunchy spots.

What dishes go well with paratha?

Dietary Comment:

  • The calorie count is based on 2000 calories.
  • Per serving contains 123 calories, along with 21.6 g carbohydrates, 3.3 g dietary fiber, 3 g fats, and 4 g protein.
  • Portion size can always be increased or decreased depending on your health goals and activity level.

Good Time To Eat:

           It is good to eat Whole Wheat Paratha for breakfast, lunch, snacks, or for dinner.

  • If you make this recipe, share your food picture with hashtag #aaichisavali on Instagram and Facebook, so everyone can enjoy it too! 
  • Subscribe to my YouTube channel for Healthy, Tasty, Instant Pot, and Air fryer recipes.

Eat Healthy, Stay Healthy!!!