Wednesday, July 28, 2021

How to Make Coconut Shrimp in the Air Fryer

Hello Foodies,

         Coconut and Shrimp Lovers we've got this special dish for you! This crispy  Coconut Shrimp is a delicious restaurant-style seafood dish you can make in minutes in the air fryer. 

Shrimps are coated in coconut flakes, breadcrumbs, and spices and cooked in the Air Fryer. Served with a dipping hot sauce. It is one of the easiest restaurant-style seafood appetizers that you can make at home! 

Video Recipe:

Even better, this version is healthier than the traditional fried version, so you can have more of them without the guilt. The air fryer has quickly become a popular appliance. It makes healthier versions of deep-fried foods and can speed up cook time. So give it a try and make a delicious and tropical Coconut Shrimp this summertime season!

I have used an Aukey Home Air Fryer:

  • This air fryer features a transparent window that allows you to see how well your dinner is cooking without lifting the air fryer lid.
  • It has 8 preset menus including Max Crisp, Air Fry, Air Broil, Air Grill, Air Roast, Bake, Dehydrate, and Reheat.
  • The unit came with a nonstick Detachable Basket with two handles and a crisper plate.
  • This Aukey home Air Fryer has worked really well. Cooking is a breeze with an aukey air fryer. 
  • I love its control touchscreen and methods of cooking. We would recommend this device to anyone looking for a nice air fryer.

Some More Air Fryer Recipes to Try:

Prep Time: 5 Minutes; Cooking Time: 10 Minutes.

Ingredients:

  • 9-10 Shrimps with tails attached, thawed and pat dried(I have used Frozen)
  • ¾ Cup Unsweetened Coconut Flakes
  • ½ Cup Bread Crumbs
  • 1 Tsp Red Chili Powder
  • ½ Tsp Garlic Powder
  • Salt to taste
  • 1 Egg, Whisked
  • ¼ Cup all-purpose flour
Instructions:

To Make Coconut Coating:

  • In a bowl/plate, combine coconut flakes, bread crumbs, red chili pepper, garlic powder, and salt. 
  • In a separate bowl whisk the egg.
  • Take all-purpose flour in a bowl.
  • Pat dry shrimps and dip them into all-purpose flour, then dip into egg mixture followed by the coconut-crumbs mixture. 
  • Coat all the sides evenly.

To Air Fry Coconut Shrimps:

  • Preheat the Air Fryer at 360 F for 2 minutes.
  • Spray the preheated air fryer basket with oil. 
  • Place coated shrimp in one layer inside the air fryer basket.
  • Insert the air fryer basket and lock the lid.
  • Air fry shrimp at 360 °F for 10 minutes.
  • Flip it over after 5 minutes and air fry for another 5 minutes or until it's golden brown. 
  • Serve crispy and flavorful air-fried coconut shrimps with your favorite dipping sauce. Enjoy!!!

Tips to Make Coconut Shrimps:

  • If using frozen shrimp, then make sure that it has been thawed.
  • Don't overcrowd the air fryer's basket, this will prevent the shrimp from getting crispy.
  • Be sure to pat dry your shrimp, to avoid a soggy crust.
  • Don’t forget to flip the shrimp halfway through the cooking process, this will allow even cooking.

Dietary Comment:

  • The calorie count is based on a 2000 calorie diet.
  • Per serving contains 312 calories, 38 g carbohydrates, 4 g dietary fiber, 10 g fats, and 21 g protein.
  • Portion size can always be increased or decreased depending on your health goals and activity level.
  • (Please keep in mind that the nutritional information is calculated using a nutrition facts calculator. It is a rough estimate and can vary significantly based on the products used).

Good Time To Eat:

            It's good to eat coconut shrimp for Snacks or Appetizers, lunch, and dinner.

  • If you make this recipe, share your food picture with hashtag #aaichisavali on Instagram and Facebook so that everyone can enjoy it too! 
  • Subscribe to my YouTube channel for Healthy, Tasty, Instant Pot, and Air fryer recipes.
  • I love it when you try my recipes and send me pictures & feedback.

Eat Healthy, Stay Healthy!!!

How to Bake Sweet Potatoes in the Air Fryer

Hello Foodies,

          Air Fried sweet potatoes are a great and nutritious choice! And you will get amazingly light and fluffy sweet potatoes with the perfect crispy skin! My family loves baked sweet potatoes, slathered with some butter/ghee and jaggery. So Yummy!

If you’re looking for the best, baked, sweet potato, then air frying is the way to go. Every time you will get fluffy on the inside, crispy on the outside air-fried sweet potatoes.

Video Recipe:

Aukey Home Air Fryer:

  • This air fryer features a transparent window that allows you to see how well your dinner is cooking without lifting the air fryer lid.
  • It has 8 preset menus including Max Crisp, Air Fry, Air Broil, Air Grill, Air Roast, Bake, Dehydrate, and Reheat.
  • The unit came with a nonstick Detachable Basket with two handles and a crisper plate.
  • This Aukey home Air Fryer has worked really well. Cooking is a breeze with an aukey air fryer. 
  • I love its control touchscreen and methods of cooking. We would recommend this device to anyone looking for a nice air fryer.

Some More Air Fryer Recipes to Try:

Prep Time: 5 Minutes; Cooking Time: 40 Minutes.

Ingredients:

  • 2 Sweet Potatoes, Medium Sized 
  • 1-2 Tsp Olive oil
  • Salt to taste
  • 1-2 Tsp Butter/Ghee for serving(optional)

Instructions:

  • Preheat the Air Fryer at 400 F for 3 minutes.
  • Wash, scrub and dry the sweet potatoes(They’re grown in dirt, so they’ll need a good cleaning).
  • To even bake and keep the sweet potatoes from exploding in the air fryer, use a fork and pierce the skin of the potatoes 8-9 times per potato.
  • Drizzle olive oil over sweet potatoes and rub them into potatoes to coat well.
  • Sprinkle some salt (if using).
  • Place sweet potatoes on an air fryer basket, making sure to leave some space between them and not stacking them.
  • Air Fry at 400 F for 40 minutes.
  • Flip after 20 minutes and cook for 20 minutes.
  • Once done, take potatoes out.
  • Using a fork and knife cut at the center.
  • Serve them with butter and a sprinkle of jaggery/sugar. Enjoy!!!

How to Store Baked/Air Fried Sweet Potatoes?

  • Transfer leftovers to an airtight container or wrap tightly with foil and transfer to the refrigerator for up to 4-5 days.
  • Freeze for up to 2-3 months.

Options to Serve Sweet Potatoes:

  • Serve as a side dish.
  • Make a creamy mashed sweet potato dish
  • Use as a stuffing for parathas

Dietary Comment:

  • The calorie count is based on a 2000 calorie diet.
  • Per serving contains 86 calories, 20 g carbohydrates, 3 g dietary fiber, 0.1 g fats, and 1.6 g protein.
  • Portion size can always be increased or decreased depending on your health goals and activity level.
  • (Please keep in mind that the nutritional information is calculated using a nutrition facts calculator. It is a rough estimate and can vary significantly based on the products used).

Good Time To Eat:

            It's good to eat baked Sweet Potatoes for breakfast, lunch, and dinner.

  • If you make this recipe, share your food picture with hashtag #aaichisavali on Instagram and Facebook so that everyone can enjoy it too! 
  • Subscribe to my YouTube channel for Healthy, Tasty, Instant Pot, and Air fryer recipes.
  • I love it when you try my recipes and send me pictures & feedback.

Eat Healthy, Stay Healthy!!!

Saturday, July 24, 2021

How to Make One Pot Rigatoni Martino Pasta

Hello Foodies,

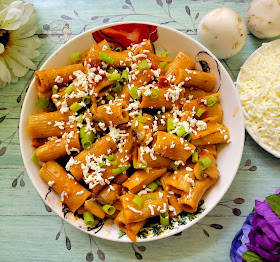
         Have you tried Carrabba's Rigatoni Martino Pasta? Tubular Rigatoni pasta is cooked in the instant pot with creamy and delicious pink sauce/marinara-cream sauce and topped with ricotta cheese. The taste is phenomenal and delicious meals can be made at home with a few simple ingredients in less than 30 minutes.

Carrabba’s Copycat Rigatoni Martino is made with Tubular Rigatoni pasta shells, sun-dried tomatoes, green onions, marinara sauce, and mushrooms and topped with ricotta cheese.

Video Recipe:

What is Ricotta Salata Cheese and what are the substitutes?

Ricotta Salata is a harder, salty cheese that is suitable for grating. If you can't find Ricotta Salata? Try using Feta cheese, or Pecorino Romano, or provolone cheese. Although feta is saltier and tangier, the texture is very similar to Ricotta Salata. If you'd like to stick with Italian cheese, Pecorino Romano can also be used in place of Ricotta Salata. The Greek cheese Mizithra is also a decent substitute for Ricotta Salata. The Mexican cheese Cotija is also similar to Ricotta Salata, however, the texture is drier and the flavor isn't particularly nutty at all.

What is Rigatoni Martino?

The Rigatoni Martino recipe is a combination of sun-dried tomatoes, mushrooms, and rigatoni tossed in a pink/marinara sauce, then topped with ricotta cheese and green onions. I made a vegetarian version of rigatoni Martino, but you can add meat of your choice.

This Instant Pot Rigatoni Martino Pasta is:

  • Creamy,  and delicious dinner/lunch ready in less than 30 minutes.
  • No preservatives or artificial ingredients used
  • One-pot meal
  • Easy to make and packed with delicious flavors
  • Always get a perfectly cooked pasta
  • It makes a comforting and flavorful meal
  • Perfect for any occasion

Preparation Time: 10 Minutes: Cooking Time: 15 Minutes. 

Each Serving of Rigatoni Martino Pasta Contains 324 Cal.

Ingredients:

  • 7-8 oz Rigatoni Pasta
  • 1 Tbsp Olive Oil
  • 3 Tbsp Scallions/Green onion
  • 2 cloves of Garlic, minced
  • 3-4 Tbsp chopped Sun-Dried Tomatoes
  • ½ Cup Sliced Mushrooms
  • 1 cup Marinara sauce
  • 2 Cups Veg.Broth
  • ¼ Cup Heavy Cream
  • Salt and Pepper to taste
  • Ricotta Cheese to top/garnish pasta

Instructions:

  • Turn on the saute mode of the instant pot and heat olive oil. 
  • Add green onion, mushrooms, garlic, and sun-dried tomatoes and saute and cook for 2-3 minutes.
  • Now, add rigatoni pasta shells, marinara sauce, and veg broth/water and give it a quick stir.
  • Close the lid and place the vent in the sealing position.
  • Cook on manual pressure(Hi) for 4 minutes.
  • Natural pressure release(NPR) for 5 minutes and then release the remaining pressure manually. 
  • Open the lid and give the pasta a quick stir.
  • Pour heavy cream and mix everything well.
  • Creamy pink sauce pasta is ready to serve, place pasta in a serving bowl/plate.
  • Top rigatoni Martino pasta with green onion and grated ricotta cheese(or keep cheese in a separate bowl). Enjoy!!!

Dietary Comment:

  • The calorie count is based on a 2000 calorie diet.
  • Per serving contains 324 calories, 49.5 g carbohydrates, 4.1 g dietary fiber, 7 g fats, and 10.2 g protein.
  • Portion size can always be increased or decreased depending on your health goals and activity level.
  • (Please keep in mind that the nutritional information is calculated using a nutrition facts calculator. It is a rough estimate and can vary significantly based on the products used).

Some More Pasta Recipes to Try:

Good Time To Eat:

            It's good to eat Rigatoni Martino Pasta for lunch and dinner.

Tips to Make Pasta in the Instant Pot:

  • If you find your favorite brand’s pasta was slightly under or overdone, keep in mind to add or subtract a minute later. 
  • The addition of butter or oil(if you are making vegan) will help to reduce foaming. 
  • Don’t overcook the pasta
  • If you think pasta is too dry, add 2-3 tbsp Milk. This will depend on the pasta type that you use.
  • The pasta thickens as it cools down. So when reheating, you might have to add milk.

  • If you make this recipe, share your food picture with hashtag #aaichisavali on Instagram and Facebook so that everyone can enjoy it too! 
  • Subscribe to my YouTube channel for Healthy, Tasty, Instant Pot, and Air fryer recipes.
  • I love it when you try my recipes and send me pictures & feedback.

Eat Healthy, Stay Healthy!!!

Thursday, July 22, 2021

How To Make Pune’s Famous Street Food - Pineapple Mastani

Hello Foodies, 

             Mastani is a dessert drink, in which a glass full of a thick and creamy milkshake topped with ice cream, nuts, and sweet candied fruits. 

Similarly, Pineapple Mastani is a delightful, rich, and thick pineapple milkshake topped with ice cream, chopped nuts, and sweet candied fruit. 

Video Recipe:

How does it get the name Mastani?

            It is named after the famous Bajirao’s Mastani. This name comes from the legend of the famous Peshwa ruler Bajirao and his lover, the beautiful Mastani. Hence this delicious, famous dessert has been named after the effervescent, beautiful courtesan who stole the mighty Bajirao’s heart. Also, when this drink was served to people, they used to remark ‘Mast’ (Mast means Awesome) appreciatively; thus, this drink is called Mastani.

Some More Refreshing Summer Beverage to Try:

Preparation Time: 5 Minutes.
Each Serving of Pineapple Mastani Contains 435 Cal.

Ingredients:

To Prepare Pineapple Shake:

  • Pineapple 1 cup, Ripe, and Cubed
  • Sugar 2 tsp
  • Whole Milk 1 Cup, Chilled
  • Ice Cream 1 scoop

For Serving Pineapple Mastani:

  • Rose Syrup 1 Tbsp
  • Pineapple 2 tbsp, Chopped
  • Vanilla Ice Cream 1 Scoop
  • Almonds 1 Tsp, sliced
  • Pistachio 1 Tsp, sliced
  • Rose Syrup for glazing (optional)

Instructions:

To Prepare Pineapple Shake:

  • Add pineapple, sugar, milk, and ice cream in a blender and blend to make the milkshake.

For Serving Pineapple Mastani:

  • Prepare the glass with a drizzle of rose syrup.
  • At the bottom of the serving glass, add pineapple cubes.
  • Then pour the pineapple shake into a glass.
  • Top with Ice cream and some chopped pineapple, sliced almonds, pistachios, and rose syrup. Yummy, Cheers!!!

Tips:

  • You can use an ice cream of your choice.
  • If using pineapple is sweet, then you can skip adding sugar.
  • You can use canned shakes if fresh fruit is not available.

Dietary Comment:

  • The calorie count is based on a 2000 calorie diet.
  • Per serving contains 435 calories, along with 55.2 g carbohydrates, 1.4 g dietary fiber, 20.7 g fats, and 9.6 g protein.
  • Portion size can always be increased or decreased depending on your health goals and activity level.

  • If you make this recipe, share your food picture with hashtag #aaichisavali on Instagram and Facebook so that everyone can enjoy it too! 
  • Subscribe to my YouTube channel for Healthy, Tasty, Instant Pot, and Air fryer recipes.
  • I love it when you try my recipes and send me pictures & feedback.

Eat Healthy, Stay Healthy!!!

Saturday, July 17, 2021

Hola Rico Milk Frother Electric,14oz Variable Temp & Froth Thickness Milk Steamer, Smart LED Touch Panel Milk Warmer, Dishwasher Safe, for Latte, Cappuccino, Warm Milk, Hot Chocolate

Hello Foodies,

         If you are a big fan of tea or coffee, then this Hola Rico’s milk frother is perfect for you! It has exceeded my expectations. It can create mile-high foam and it comes with a handy little cleaning sponge which makes it very easy to clean. The compact screen is very easy to read, set desired temperature and foaminess. It puts a whole new spin on making tea, hot chocolate, latte, and cappuccino. 

This frother has worked really well. I love how it has temperature control and an amount of froth control buttons. Dr.K loves iced lattes and I like hot coffee and it has been great for both of us. It looks much sleeker and the controls are awesome, with so many settings, you can have lots of foam, a little foam, just warm milk. It heats up & froths in a minute. 

Video: 

It's a great timesaver, and I'll be having more cappuccinos at home as a result. Overall I would recommend this milk frother to save money on ordering out coffee every day.

  • If you make this recipe, share your food picture with hashtag #aaichisavali on Instagram and Facebook so that everyone can enjoy it too! 
  • Subscribe to my YouTube channel for Healthy, Tasty, Instant Pot, and Air fryer recipes.
  • I love it when you try my recipes and send me pictures & feedback.

Eat Healthy, Stay Healthy!!!

Tuesday, July 13, 2021

How To Make Chicken Burger Patties in the Air Fryer

Hello Foodies,

          This homemade Air Fryer Chicken Burger has a sweet, savory, spicy balance of flavor, and it’s way better than takeout! 

Used my meat grinder to make the seasoned chicken patties and an air fryer to make perfect crispy and non-fried Chicken Patties for burgers. Served Air Fried patties on a toasted burger bun, with tomato and hot sauce, cheese, and crunchy lettuce, onion, and tomatoes. 

Video Recipe:

Ever wonder why your favorite restaurant has an unbelievably juicy burger you just cannot seem to replicate at home? Freshly ground meat! It’s the secret ingredient to an epic burger! So why purchase pre-ground, overly packed burger patties/meat, which will surely lead to a dried-out burger, when you can grind your own? I did try grinding meat using my meat grinder and burger patties turned out juicy, tender and so perfect. It’s time to put that air fryer to use! The air fryer cooks food quickly, but it’s also a great appliance to use on hot summer days. 

Tips to Make Chicken Burger:

  • Fry 2-3 burger patties at a time so you don’t crowd the air fryer. This will help create a nice crust on the burger that browns.
  • Don’t over-mix the meat, overmixing will make a tough burger.
  • serving suggestions: Serve atop lettuce for a low-carb option

Some More Air Fryer Recipes to Try:

Ingredients:

To Make Burger Patties:

  • Chicken Breast Pieces 1 lb
  • Ginger-Garlic Paste 1 Tsp
  • Red chili powder 1 Tsp
  • Turmeric ½ Tsp
  • Salt ½ Tsp
  • Egg 1
  • Bread crumbs ½ Cup
  • Maida/All purpose flour ¼ Cup

Toppings:

  • Tomato slices
  • Green Pepper Slices
  • Onion slices
  • Mayonnaise
  • Mustard
  • Cheese Slices
  • Whole wheat Tortilla
  • Burger Bun

Instructions:

To Make Chicken Burger Patties:

  • In a bowl combine ground chicken, ginger-garlic paste, red chili powder, turmeric, salt, and coriander leaves.
  • Now cover and keep aside for 30 minutes.
  • Using Meat Grinder ground seasoned meat.
  • Now, divide the mixture into equal parts and gently shape the meat into balls.
  • Then using the palm flatten into patties(avoid overworking the mixture if possible).
  • Preheat the Air Fryer at 400 F for 3-5 minutes.
  • Dip the patty into flour, egg, and breadcrumbs.
  • Place the patties on the parchment-lined baking pan.
  • Now Air fry at 400 F for 10 minutes.
  • Flip after 5 minutes.
  • Using a quick read food thermometer, be sure the internal temperature is 165°F, if not, add a minute or two of cooking time until it is.
  • Once done, take them out and serve.

To Make the Chicken Burger Tortilla Wrap:

  • Make the cut in the center of the tortilla, make a cut outwards to the edge of the tortilla.
  • Add the fillings: divide the surface area into 4 parts(visually) based on the layers you want and place your toppings.
  • Place Chicken Burger Patty, Mayo, Tomato-Pepper-Onion slices, and cheese slices.
  • To Fold: Start folding the wrap from the right side of your cut and flip and flip again until you have a completely folded tortilla. 
  • Roast it(optional): you can roast tortilla wrap. I have roasted wrap on skillet/tawa, but you can use a sandwich press, or grill and roast for 1-2 minutes on each side, or until lightly browned.
  • Cut and enjoy Chicken Burger Tortilla Wrap!!!

To Make the Chicken Burger:

  • Spread mayo on the bottom half of the burger bun.
  • Place the salad greens/Lettuce on top and then chicken patty with cheese.
  • Top with tomato-onion rings and salad greens/Lettuce.
  • Cover with the top half of the burger bun. 
  • Here, a delicious Air Fryer Chicken Burger is ready to serve. Enjoy!!!

To Freeze Burger Patties:

  • To freeze, you'll want to put a piece of parchment in between each burger patty.
  • Store in a freezer-safe container or bag for up to 3 months. 
  • Burgers can be cooked straight from frozen, just will need extra time.

Dietary Comment:

  • The calorie count is based on 2000 calories.
  • Per serving contains 266 calories, along with 6 g carbohydrates, 13 g fats, and 22.2 g protein.
  • Portion size can always be increased or decreased depending on your health goals and activity level.

Good Time To Eat:

           It is good to eat Chicken Burger for lunch, snacks, or for dinner.

  • If you make this recipe, share your food picture with hashtag #aaichisavali on Instagram and Facebook so that everyone can enjoy it too! 
  • Subscribe to my YouTube channel for Healthy, Tasty, Instant Pot, and Air fryer recipes.
  • I love it when you try my recipes and send me pictures & feedback.

Eat Healthy, Stay Healthy!!!

Saturday, July 10, 2021

How to Make Broccoli Cheddar Mac & Cheese in the Instant Pot

Hello Foodies,

          Creamy rich cheese sauce, chewy pasta shells, and crunchy broccoli served in crusty bread bowls! This is one of the easiest dinners/lunches that you can make in your Instant Pot.

          Panera's new Broccoli Cheddar Mac and Cheese in Bread Bowl combination are so creamy, cheesy, and wonderful comfort food that's actually easy to make and ready in 15 minutes in the instant pot!

Video Recipe:

           It is a delicious copycat menu item at Panera Bread so you can skip the takeout. It doesn’t get much better than cheesy, delicious, homemade macaroni and cheese, and making this in the Instant Pot is a total modification. This recipe couldn’t be any easier to make, that’s why I love cooking in my Instant Pot. Just dump all the ingredients in and you get perfectly cooked, delicious food every single time. 

Why do we love this Broccoli Cheddar Mac & Cheese? Because-

  • It's a creamy, cheesy, comforting meal!
  • Easy and quick to make!
  • One-Pot Meal.
  • Simple and tastes so great.
  • It just melts in your mouth and the one that you can’t stop eating.
  • It’s creamy, dreamy, and loaded with crunchy broccolis goodness!

Some More Panera Style Recipes to Try:

Ingredients used to make Broccoli Cheddar Mac and Cheese in Bread Bowl:

Crusty Bread Bowls: I have used homemade bread bowls(Recipe here), but you can use store-bought bread bowls too.

Pasta Shells: I have used Macaroni pasta shells. But you can use any type of pasta shells you’d like for this, the possibilities are endless!

Butter: I have used butter, but you can use oil too. But if you want creamy and yummy mac and cheese then use the butter.

Sharp Cheddar Cheese: Sharp cheddar cheese is the star of this recipe. Also, I have used mozzarella cheese with cheddar. You can use Gouda, Velveeta, fontina, Monterey Jack, Colby, or any other varieties too.

Dijon/Ground Mustard: I have used dijon, this adds a nice subtle flavor to the mac and cheese.

Milk: I have used whole milk and a half and half, or you can use heavy cream instead of it, or even you can use skim milk if you want the lower fat content!

Broccoli: I have used fresh broccoli, but frozen broccoli would work too, just don't forget to thaw before adding to the pasta.

Salt and Pepper: Used salt and pepper to taste.

Water/Vegetable stock to cook the pasta shells.

Preparation Time: 5 Minutes; Cooking Time: 10 Minutes. 
Each Serving of Broccoli Cheddar Mac and Cheese Contains 290 Cal.

Ingredients:

  • Crusty Bread Bowl 
  • Macaroni 2 Cups
  • Broccoli 1 Cup
  • Garlic Powder ¼ Tsp
  • Nutmeg ¼ Tsp
  • Dijon/Ground Mustard 1 Tsp
  • Sharp Cheddar Cheese ½ Cup
  • Mozzarella Cheese ½ Cup
  • Milk 1/2 Cup+Half and Half ¼ Cup
  • Black Pepper powder ½ Tsp
  • Salt 1 Tsp 
  • Unsalted Butter 2 Tbsp 
  • Water/Vegetable Stock 3 Cups

Instructions:

To Make Broccoli Cheddar Mac and Cheese in the Instant Pot:

  • Turn on the instant pot and add water, salt, butter, and Macaroni and stir well. 
  • Close the lid and place the vent in the sealing position. 
  • Pressure Cook on Manual Mode(Hi) for 4 minutes. 
  • Quick Release the pressure. 
  • Open the lid and mix it all well. 
  • Turn on the saute mode of the instant pot.
  • Now add milk+half and half, mozzarella-cheddar cheese, salt, and black pepper, and stir to combine. 
  • Now add steamed broccoli, garlic, nutmeg, dijon and mix everything well.
  • Turn off the saute mode.
  • Cover the pot with the glass lid and keep it aside for 2-3 minutes. 
  • After 3 minutes creamy, cheesy broccoli Cheddar Mac & Cheese is ready to serve. Enjoy!!! 

To Serve Broccoli Cheddar Mac and Cheese in the Bread Bowl:

  • Cut a ½ inch thick slice from the top of each loaf to create a bowl. 
  • Scoop out the insides to create a deeper well, leaving ¾ inch thick shells(you can use scraped bread to make bread crumbs). 
  • Fill the bread bowl with Broccoli Cheddar Mac and Cheese. 
  • Top it with Parmesan Cheese, Dried Parsley. Enjoy!!!

Making Mac & Cheese ahead of time and storing:

  • Make as directed, transfer to an airtight container and cool completely. 
  • Cover tightly and refrigerate for 3-4 days.
  • Any leftovers need to be refrigerated and covered tightly.  
  • To reheat, stir in a little bit of milk and microwave and stir often as it reheats.

Tips:

  • Don't overcook the broccoli unless you want it mushy. If you add it to the pot with the pasta shells, then it will overcook it and become mushy.
  • If you are using frozen broccoli, make sure to thaw it out for about 10 minutes before adding.
  • You can make the mac and cheese up to 3 days ahead of time and store it in an airtight container in the fridge. When ready to serve, reheat in the microwave and spoon into the bread bowl.
  • Instead of parmesan cheese, you can top it with seasoned or plain bread crumbs.

Dietary Comment:

  • The calorie count is based on a 2000 calorie diet.
  • Per serving contains 290 calories, 26.4 g carbohydrates, 3.1 g dietary fiber, 14.6 g fats, and 13.2 g protein.
  • Portion size can always be increased or decreased depending on your health goals and activity level.
  • (Please keep in mind that the nutritional information is calculated using a nutrition facts calculator. It is a rough estimate and can vary significantly based on products used.)

Some More Pasta Recipes to Try:

Good Time To Eat:

            It's good to eat Broccoli Cheddar Mac and Cheese for lunch and dinner.

  • If you make this recipe, share your food picture with hashtag #aaichisavali on Instagram and Facebook so that everyone can enjoy it too! 
  • Subscribe to my YouTube channel for Healthy, Tasty, Instant Pot, and Air fryer recipes.
  • I love it when you try my recipes and send me pictures & feedback.

Eat Healthy, Stay Healthy!!!

Friday, July 9, 2021

How to Make the Best Thai Peanut Sauce/Dressing/Dip

Hello Foodies,

         Eat the rainbow! We just love this colorful Buddha bowl. Thai Peanut Buddha Bowl is a healthy, hearty, salad tossed in a flavorful, creamy Thai peanut dressing/sauce and loaded with colorful veggies. 

This Thai-inspired salad is as scrumptious as it looks. It will make a perfect addition to really any meal.⁠ Thai peanut dressing made using just a few pantry staples. This peanut dressing is a great shortcut to a flavorful weeknight dinner! Serve it over some rice noodles or even veggie noodles for a complete meal that the whole family is going to love.

Video Recipe:

          Rich & spicy Thai peanut sauce is just incredible and this is the best I’ve ever had. It’s easy, tasty, and versatile. It can be eaten with noodles, buddha bowls, veggies, spring rolls, meat, pasta and you name it. This veggie salad bowl is bursting with flavor and is so easy to make that it will definitely become a weekly go-to recipe. Do give it a try!

Preparation Time: 5 Minutes.
Each Serving of Thai Peanut Dressing/Sauce contains 70 Cal.

Ingredients:

  • ¼ Cup Peanut Butter
  • 1 Tbsp Lime juice
  • 1 Tbsp Rice Vinegar
  • 1 Tbsp Low-sodium Soy Sauce 
  • 1 Tbsp Honey (or maple syrup or agave)
  • 1 Tsp Olive oil/Sesame oil
  • 1 Tsp Sriracha
  • ¼ Tsp Ginger, grated
  • ¼ Tsp Garlic, grated
  • 1-2 Tbsp Water(or you can use coconut milk too), if needed
Instructions:

  • Place all the ingredients In a food processor or blender.
  • Blend/Pulse until smooth, creamy, stopping to scrape down the sides a few times. 
  • If you’d like to make your dressing thinner, just add a little more water. 
  • Keep in an airtight container and refrigerate for up to 1 week. 
  • If the dressing is too thick, simply add coconut milk/water one tsp at a time to thin it out to the desired consistency.
  • I have used this dressing to make colorful vegetable salads. Enjoy!!!

This is a versatile recipe that can be used as a sauce, dip, or marinade. 

Use it-

  • As a marinade for Paneer, Chicken, or Tofu.
  • A dip for veggies.
  • Or a spring roll dip.
  • Mix it into some rice.

Tips:

  • If peanut butter is very thick, then microwave it for about 15 seconds before blending so that it’s smooth enough to blend with all the other ingredients.
  • Adjust the sauce as your taste. You can make it saltier, sweeter, spicier as you like!
  • You can double this sauce if you want. I recommend making it before you need it, but it stores in your fridge for up to a week.
  • If you’re allergic to peanuts, you can swap peanuts with almonds, tahini, sunflower seed butter and they’ll all work as a great base.

Some More Dressings/Dip/Sauce Recipes to Try:

Dietary Comment:

  • The calorie count is based on a 2000 calorie diet.
  • Per serving contains 70 calories, 4.3 g carbohydrates, 5.2 g fats, and 2.7 g protein.
  • Portion size can always be increased or decreased depending on your health goals and activity level.
  • (Please keep in mind that the nutritional information is calculated using a nutrition facts calculator. It is a rough estimate and can vary significantly based on the products used).

Equipment Used: 

  • If you make this recipe, share your food picture with hashtag #aaichisavali on Instagram and Facebook so that everyone can enjoy it too! 
  • Subscribe to my YouTube channel for Healthy, Tasty, Instant Pot, and Air fryer recipes.
  • I love it when you try my recipes and send me pictures & feedback.

Eat Healthy, Stay Healthy!!!