Monday, June 29, 2020

How to Make Non-Fried Sabudana Vada/ Sabudana Vada in the Air Fryer
Hello Foodies,
           I've found the most comfortable, most approachable way to prepare Sabudana Vada is to cook them in the Air Fryer. To make the extra crispy Sabudana Vada, you can air fry some more time, and that will taste like they've been fried! So Addictive! You can make batches without having to stand at constant attendance. Plus, these vadas are healthier fast food. These vadas are an excellent option for busy weekdays breakfast, or when you just need a snack. 


           I love these delicious sabudana vadas because they are healthy, nutritious, vegan, gluten-free, and versatile.         
Video Recipe:

What is Sabudana Vada?
          So the Sabudana Vada(Sago/Tapioca Fritters) is a famous fast food/snack originating from the western part of India. They are mainly prepared with tapioca pearls, potato, peanuts power, green and red chilies, and are usually served with peanuts chutney/green chutney and enjoyed with hot tea and are really a treat on a fasting day. Making sabudana vada needs to soak for a few hours before it is ready to use, and you are good. 

These Air Fryer Sabudana Vadas are:
  • Crispy and Tasty
  • Healthier version than deep-frying
  • Addictively delicious
  • Easy to make
  • Vegan and Gluten-free

Some other Fasting Recipes to Try:

Preparation Time: 10 Minutes; Cooking Time: 15 Minutes.
Each Sabudana Vada contains 54 Cal.

Ingredients:
  • Sabudana 2 Cups
  • Potato 2 medium-sized, boiled
  • Dry Roasted Peanuts Powder 3 tbsp
  • Salt 1 tsp
  • Green chilies 5 strips, minced
  • Red Chili Powder 1 Tbsp
  • Coriander leaves 2 Tbsp.
  • Cumin seeds 1 tsp
  • Lemon Juice 1 Tbsp
  • Ghee/Oil to grease the air fryer basket
Instructions:
  • Rinse the sabudana and place it in a bowl with enough water, cover and keep aside for at least 3-4 hours.
  • Meanwhile, boil the potatoes, peel, and mash them.
  • Roast the peanuts and grind to make powder, mince the green chilies and keep them ready. 
  • In a bowl, add all the ingredients(sabudana, peanuts powder, potato, green chilies, red chili powder, chopped coriander leaves, lemon juice, salt, and cumin seeds) together.
  • Mix well together to make the dough.
  • Divide dough into equal portions and make small balls and flatten them slightly.
  • Similarly, roll remaining vadas and keep it aside.

To Air Fry Sabudana Vada:
  • Preheat Air Fryer @350 F for 3 Minutes.
  • Transfer the sabudana patties or vadas into the air fryer basket and spray some cooking oil. 
  • Close the basket of the air fryer. 
  • Air Fry at 350 F for 15 minutes and flip after 7-8 minutes.
  • Here low calorie, non-fried, crispy, and tasty sabudana vadas are ready to serve. Serve hot with fasting groundnut chutney/curd. Enjoy!!!

How & with What to Serve Sabudana Vada:
  • Sabudana vada is served with Peanuts Chutney / Green Chutney / Yogurt accompanied with hot tea/beverage.

My Take:
  • The sabudana should be soaked well and should be very soft.
  • If you do not have an air fryer, then you can shallow fry the vadas in a pan with little oil or use appe pan as I did here.
  • You can use Rajgira Flour/Paneer/tapioca flour/arrowroot powder as a binder/binding agent.

How to freeze uncooked sabudana vada:
  • Sabudana vadas can be made in advance and frozen. 
  • Rolled patties/uncooked vadas can be frozen for 3-4 weeks.
  • Use a parchment paper in between two vadas else it will be difficult to separate the vadas after freezing.
  • Thaw them before cooking/air frying.
Dietary Comment:
  • The calorie count is based on a 2000 calorie diet.
  • Per serving contains 54 calories, along with 11 g carbohydrates, 1 g dietary fiber, 0.5 g fats, and 1.23 g protein.
  • Portion size can always be increased or decreased depending on your health goals and activity level.
  • (Please keep in mind that the nutritional information is calculated using a nutrition facts calculator. It is a rough estimate and can vary significantly based on products used.)
Good Time To Eat:
           It is good to eat Sabudana Vada for Breakfast, Lunch, Brunch, or Dinner.
  • If you make this recipe, share your food picture with hashtag #aaichisavali on Instagram and Facebook so that everyone can enjoy it too! 
  • Subscribe to my YouTube channel for Healthy, Tasty, Instant Pot, and Air fryer recipes.
  • I love it when you try my recipes and send me pictures & feedback.
Eat Healthy, Stay Healthy!!!

Friday, June 26, 2020

How to Make Chicken Karahi in the Instant Pot
Hello Foodies,
     It is a luscious restaurant-style Northern Indian Chicken Recipe, just like you would get in a restaurant. Not like you usually make at home. That little bit of cream really makes the dish tasty after you add it. You’ll see how big it is. It is a restaurant-style Chicken Recipe, but it has homestyle tastes. It’s mom’s style of cooking chicken in her kitchen, nothing unusual here. Just simple ingredients put together in a way that tastes amazing. This recipe doesn’t call for a bunch of ingredients you’ve never heard of. The spices are simple, and you can get almost everything from your local grocery store.


What is a Karahi(Kadai) Chicken?
Karahi/Kadhai is a thick, circular, metal cooking pot(similar to a wok) used in Indian cooking for curries, sautéed vegetables, and deep-frying. Traditionally made out of cast iron, karahi looks like woks with steeper sides(Also, you can find kadhai made of stainless steel, copper, and non-stick surfaces, both round and flat-bottomed). Traditionally, karahi vessels are used for frying and making stews. The dishes that are cooked in a karahi are often called by that name as well. 

Video Recipe:

Chicken Karahi is a famous North Indian curry and is so quick and easy to prepare. This spicy, homestyle curry on the menu which is often served with naan or roti right from the tandoor. With just a little chopping and some hands-off simmering time, you can have a flavorful curry dinner on the table in 30 minutes! North Indian Chicken Karahi tends to include onions and green peppers, while Pakistani Chicken Karahi does not.
If you’re not a spice lover, you can always adjust the number of green chilies if you prefer a milder heat.
IS KARAHI CHICKEN CURRY HOT? 
       No, it’s not. There are lots of warming spices in this dish, as well as chilies. But, it doesn’t have to be mouth-flaming hot. Choose your chili based on your heat/spiciness preference. As the dish simmers, the heat will mellow, leaving a wonderful flavor and just a bit of warming heat. To reduce the spice in this curry, reduce the quantity of red chili powder, garam masala, and ginger by half.

WHAT TO SERVE WITH CHICKEN KARAHI?
It Tastes Awesome when serves with any Indian flatbread like,
Other Chicken Recipes to Try:
Ingredients:
Spice Mix:
  • 1 Tbsp Kashmiri Red Chili Powder
  • 1 Tsp Garam Masala
  • 1 Tsp Coriander Powder
  • 1 Tsp Cumin Powder
  • ¼ Tsp Black Pepper Powder
  • ½ Tsp Turmeric
  • 1 Tsp Salt
To Make Karahi Chicken in the Instant Pot:
  • 12 oz Boneless Skinless Chicken Breast(you can use thighs too)
  • 2 Tbsp Vegetable Oil
  • ½ Tsp Cumin seeds
  • 1 Onion medium, finely diced
  • 3 Tbsp Tomato Paste 
  • 1 Tbsp garlic-ginger paste
  • 3 Green Chilies sliced
  • 2 Tbsp Milk Cream 
  • ¼ Green & Yellow Bell Pepper, Diced
  • 2 Tbsp Cilantro/Coriander leaves, finely chopped
  • Ginger for garnishing, julienned
  • Water 1 Cup

Instructions:
The spice mix:
  • Combine all the spice mix ingredients and set aside.
To Cook Chicken Karahi In the Instant Pot:
  • Turn on the Sauté mode of the Instant Pot and heat oil. 
  • Add onions, ginger-garlic paste and saute and cook for 3-4 minutes or until the onions turn translucent. 
  • Add green chilies, ginger-garlic paste, and tomato paste and mix well.
  • Add the chicken, spice mix, and water and stir well.
  • Close the lid of the Instant Pot and place the valve to the sealing position. 
  • Pressure Cook on Manual Mode(Hi) for 5 minutes. 
  • Allow the pressure to release naturally for 10 minutes and then release the remaining pressure manually.
  • Turn on the saute mode of the instant pot and add milk cream, diced onion, green and yellow pepper, and mix well.
  • Cook for 2-3 minutes and turn off the instant pot.
  • Garnish with cilantro and julienne ginger. 
  • Chicken Karahi is ready to serve, serve hot with naan and rice. Enjoy!!!

Dietary Comment:
  • The calorie count is based on a 2000 calorie diet.
  • Per serving contains 270 calories, along with 11.7 g carbohydrates, 2.7 g dietary fiber, 13 g fats, and 27.6 g protein.
  • Portion size can always be increased or decreased depending on your health goals and activity level.
  • (Please keep in mind that the nutritional information is calculated using a nutrition facts calculator. It is a rough estimate and can vary significantly based on products used.)
Good Time To Eat:
           It is good to eat Chicken Karahi for Lunch, Brunch, or Dinner.

  • If you make this recipe, share your food picture with hashtag #aaichisavali on Instagram and Facebook so that everyone can enjoy it too! 
  • Subscribe to my YouTube channel for Healthy, Tasty, Instant Pot, and Air fryer recipes.
  • I love it when you try my recipes and send me pictures & feedback.
Eat Healthy, Stay Healthy!!!

Thursday, June 25, 2020

How to Make Eggless Mango Cake without Condensed Milk
Hello Foodies,
         A light, moist, super spongy, and yummy mango cake for the mango season and prepared with few ingredients.

 This cake is absolutely one of the best I’ve ever made. Dr.K agrees. This cake is rich with flavors, perfectly crumbly and delicious. We(Dr.K & I) just love mangos, and thankfully they are available year-round to satisfy the craving when it hits! 


        I have been getting a few requests to post an eggless mango cake since mangoes are in season. So here, I made egg-free, butter-free, delectable mango cake. The cake is made with whole wheat flour, but you can also make the cake with all-purpose flour(maida) or half-half of both whole wheat flour and all-purpose flour. The cake has a pleasant aroma of mangoes along with a light, soft texture. There is also the nutty aroma of whole wheat flour in the cake. The garnishing of sliced pistachios makes this cake looking fabulous & so delectable! 
Video Recipe:

         Mango is the main ingredient of this cake, so make sure to pick some good, sweet ripe ones. Mangos add beautiful color, incredible flavor, and a healthy boost of nutrients to the cake. You can use mango varieties like Alphonsa, Kesar, or Hapus, but don’t use sour mango else the cake taste bad.
Some Other Mango Recipes to Try:

Preparation Time: 15 Minutes; Baking Time: 30 Minutes.
Each Slice of Mango Bread/Cake Contains 147 Cal.

Ingredients:
Dry Ingredients:
  • ¾ Cup Whole Wheat Flour
  • ¾ Cup Cake Flour / Maida(All-purpose flour)
  • 2 Tbsp Almond Flour(Optional)
  • 1/2 Tsp Baking Powder
  • ¼ Tsp Baking Soda
  • ¼ Tsp Salt
  • Pistachios, sliced to garnish
Wet Ingredients:
  • 1 Cup Kesar Mango Puree(See Tips if using fresh mango)
  • 1 tsp Mango Essence / Cardamom Powder
  • ⅓ Cup Oil 
  • ½ Cup Milk 
  • ¼ Cup Sugar 

Instructions:
  • Preheat the oven at 350 F(180°C) and prepare a baking pan with butter and flour.
  • In a bowl sieve dry ingredients (whole wheat flour, cake flour, almond meal, baking soda, baking powder, and salt)
  • In another bowl, add sugar, mango pulp, oil, milk, and mango extract. 
  • Whisk well till sugar is almost dissolved and smooth.
  • Now add dry ingredients to the wet ingredients and mix/fold all well.
  • Don’t over mix, mix enough to get a smooth batter.
  • Pour the batter into the prepared baking pan and 
  • Tap well to remove the air bubbles, if any, and top it with some sliced pistachios.
  • Bake in the preheated oven for 30-35 minutes or until a toothpick inserted in the middle comes out clean.
  • Take the bread out of the loaf pan after 5 min and cool on a wire rack.
  • Slice only when cooled completed. 
  • Serve with vanilla ice cream or sandwich between custard. Enjoy!!!

Store and Shelf Life:
  • This cake stays good for 2 to 3 days at room temperature.
  • Stays good for 1 week in refrigerate, but warm it before eating.

Tips to Make Mango Cake:
  • Ensure baking powder, and baking soda is within the expiry date, else the cake won’t raise and turns spongy.
  • If you are using fresh mango, use ripe, sweet, deep yellow colored mango for an excellent taste and beautiful color. I used Kesar Mango Pulp. Just avoid mangoes with a fibrous pulp.
  • Don’t over whisk the batter; else, the cake becomes hard.
  • For the vegan version, milk can be replaced with soy, almond, or cashew milk too.
  • Skip topping with sliced almonds if you want to make it nut-free.
  • Always cool the cake and then slice it, else it gets crumbled.
  • Choose correct sized baking tray, else while baking itself the cake overflows. To avoid this, fill the batter to 1/2 of the tray.
  • If the cake doesn’t get baked in the center, cover the tray with an aluminum foil or butter paper and bake for another 10 minutes.
  • You can use cinnamon, nutmeg to enhance the flavor.
  • You can add jaggery instead of sugar.
  • I have used almond flour to enhance the flavor and make it more healthy, you can totally skip adding it.

Dietary Comment:
  • The calorie count is based on a 2000 calorie diet.
  • Per serving contains 147 calories, along with 24 g carbohydrates, 2.5 g dietary fiber, 5.2 g fats, and 2.4 g protein.
  • Portion size can always be increased or decreased depending on your health goals and activity level.
Good Time To Eat:
           It is good to eat Eggless Mango Bread/Cake as a dessert or for breakfast.

  • If you make this recipe, share your food picture with hashtag #aaichisavali on Instagram and Facebook so that everyone can enjoy it too! 
  • Subscribe to my YouTube channel for Healthy, Tasty, Instant Pot, and Air fryer recipes.
  • I love it when you try my recipes and send me pictures & feedback.
Eat Healthy, Stay Healthy!!!

Saturday, June 20, 2020

How to Make Creamy and Delicious Instant Pot Taco Pasta Salad
Hello Foodies,
         Tex-Mex Style creamy, healthy, and nutritious mashup healthy pasta recipe cooked in Instant Pot and tossed with creamy Tex-Mex Taco Dressing. It is a cold Mexican/Southwest pasta salad recipe filled with black beans, corn, cilantro, jalapeno, avocados, and tomatoes.

 I love taking this Taco Pasta Salad to potlucks and BBQs. It’s a Mexican dish everyone loves, and this meal comes together really quickly. Pick whatever pasta you like and cook in the instant pot for 4 minutes. Once it has cooled toss in your beans, corn, and cilantro. Voila! Delicious Treat!
Video Recipe:

         The protein-rich black beans and other veggies are healthy and bring crunch to the pasta that will make you happy. The fresh vegetables and whole grains will leave you feeling good for treating yourself to a wholesome meal. And, the addition of Mexican spices, taco dressing, tomatoes, and salsa makes this Taco Pasta taste well-rounded and so perfect.

Tips to Make Pasta Salad:
  • Cook pasta al dente (but not mushy) so that the pasta stays soft when it cools.
  • Let your pasta cool entirely before tossing it with the other ingredients.
  • Taste and adjust the salt and pepper accordingly. 
  • Add more lemon juice if you prefer a tangier salad.
  • Save some veggies, taco dressing, and herbs for garnish.

Why Cook Pasta in the Instant Pot?  
         If you’ve ever made pasta in the Instant Pot, you know how it comes out! It’s so fast and hasslefree!  And the best part is that you no longer have to stand in the kitchen watching the water boil and asking yourself if the pasta is done cooking yet.  The Instant Pot does all of the work for you! And the result is perfectly cooked pasta ready in 4 minutes.

Some more Instant Pot Pasta Recipes to Try:

Preparation Time: 10 Minutes; Cooking Time: 4 Minutes. 
Each Serving of Taco Pasta Salad Contains 222 Cal.

Ingredients:
To Cook Pasta in the Instant Pot:
  • Bowties Pasta 5 oz
  • Water 3 cups
  • Oil ½ Tsp
  • Salt ½ Tsp
To Make Taco Pasta Salad:
  • Cooked Pasta
  • Taco Salad Dressing 1 Cup
  • Sweetcorn ½ cup
  • Tomato 1, Diced
  • Jalapeno 1 small, finely chopped
  • Yellow Bell Pepper ½, Diced
  • Orange Bell Pepper ½, Diced 
  • Avocado 1, Chopped
  • Black Beans 1 Cup(I have used Goya’s Canned Beans)
  • Cucumber 1 Small, chopped 
  • Taco Seasoning for taste(optional)
  • Cumin powder ½ Tsp
  • Salt & pepper to taste
  • Cheddar Cheese 2 Tbsp 
  • Coriander Leaves for garnishing

Instructions:
To Cook Pasta in the Instant Pot:
  • Turn on the instant pot and add water, salt, oil, and Bowties Pasta and stir well. 
  • Close the lid and place the vent on the sealing position. 
  • Now, Pressure Cook on Manual Mode(Hi) for 4 minutes. 
  • Quick Release the Pressure.
  • Take the corns out and drain the water from the pasta and let it cool.
To Make Pasta Salad:
  • In a large bowl, toss the pasta with bell pepper yellow and orange, jalapeno, jalapeno,  cucumber, sweetcorn, tomatoes, beans, and avocado. 
  • Pour prepared taco dressing and add taco seasoning, salt, and pepper for taste and mix well.
  • Garnish with fresh coriander and let it sit for 5-10 minutes and serve with Mexican Corns. Enjoy!!!

Instructions to make pasta on the stove-top:
  • To make this pasta on stove-top, boil the pasta in a pan according to instructions on the package. 
  • Once cooked, discard the water and set it aside.
Storage and Shelf Life: 
  • Store any leftovers in an airtight container in the fridge. 
  • They will last about 2 days in the fridge.

Dietary Comment:
  • The calorie count is based on a 2000 calorie diet.
  • Per serving contains 222 calories, 33.3 g carbohydrates, 5 g Dietary Fiber,  9.8 g fats, and 6.3 g protein.
  • Portion size can always be increased or decreased depending on your health goals and activity level.
Appliances used: 
  • I used my KOIOS 4-in-1 Multifunctional Hand Blender and Food Processor to make the creamy avocado dressing. It has a high and low pulse speed so you can make the sauce pretty smooth and silky.
  • Also, I have used my 8 qt—instant pot to cook pasta.
Variations/Substitute Options:
These tasty Tex-Mex Taco Pasta salad toppers are delicious! I’ve included a mix of vegan, vegetarian, and non- vegetarian options.
Veggies:
The more veggies, the more healthy pasta. Here are some options: 
You can use Fresh Dill, Parsley, Basil. Also, you can use Asparagus (blanched and chilled), Broccoli, Cauliflower, Snow, Sweet or Sugar Snap Peas, Olives, Onion, 
Seeds & Nuts:
You can use Pumpkin Seeds, Sunflower Seeds, Sesame seeds, Cashews, Almonds, Pistachios too.
Pasta Options:
To make this gluten-free, use any gluten-free pasta you’d like and cook it al dente.
Use your favorite variety of pasta shells & shapes:
I have used the Bow-Tie Farfalle. 
You can use classic Tri-Colored Veggie Rotini, Mini Shells, ABC Pasta, Elbow Macaroni, Spaghetti noodles, or Tortellini.
Cheese Options:
Cheddar, Mozzarella, Feta, Parmesan Cheese
Protein Options:
Shredded Chicken, Turkey, Scrambled Egg, Shrimps.

  • If you make this recipe, share your food picture with hashtag #aaichisavali on Instagram and Facebook so that everyone can enjoy it too! 
  • Subscribe to my YouTube channel for Healthy, Tasty, Instant Pot, and Air fryer recipes.
  • I love it when you try my recipes and send me pictures & feedback.

Eat Healthy, Stay Healthy!!!

Friday, June 19, 2020

How to Make Creamy Tex-Mex Taco Dressing?
Hello Foodies,
        A Delicious and creamy Tex-Mex-Style Taco Salad Dressing is our favorite nowadays. It goes absolutely with everything. I use it to make a taco salad or homemade tacos, but it can also be used as a sauce for a Tex-Mex-style chicken or steak entree. It offers a more luxurious texture than any other dressing I’ve tried. These days I love making homemade salad dressing. There’s really no comparison between dressings you can buy from the store and ones you make at home shaken in a mason jar or blended in the blender. So easy to make and taste AMAZING!


         I used yogurt in the place of mayonnaise, but this salad dressing tasted the same without it. While homemade salad dressing can seem complicated or intimidating to a home cook, this sour cream-based version is easy to whip up in just a few minutes with a blender, immersion blender, or food processor.
Video Recipe:

        Cilantro, a common Tex-Mex ingredient that’s included in this recipe, is a healthy and flavorsome herb. If you happen to be one of the people who can’t stand the taste of cilantro, leave it out of the recipe or use basil, parsley, or mint. Try this taco salad dressing with Fresh greens of any kind(Avocado, Broccoli, Kale, Cabbage), Fresh Fruits, or with Dry Nuts.

Some Other Salad and Salsa Recipes to Try:

NOW, LET MAKE TACO SALAD DRESSING!
This easy and instant homemade salad dressing recipe pair perfectly with Pasta Salad!

Preparation Time: 5 Minutes.

Ingredients:
  • 1 Cup Sour Cream 
  • 3 Tbsp Greek Yogurt/Mayonnaise
  • ½ Cup Chunky Salsa
  • 2 Tbsp Cilantro/Coriander + 1 Tbsp Coriander Stems
  • ½ Tsp Ground Cumin
  • ½  Tsp Red Chili Powder(mild)/ ¼ Tsp Ground Cayenne Pepper
  • Salt and pepper to taste
  • 2 Tsp Lime Juice 
  • 1 Tsp Garlic (minced)
  • Honey 1 Tbsp
  • EV Olive Oil 2 Tsp
Instructions: 
  • Place all the ingredients In a food processor or blender.
  • Blend/Pulse until smooth, creamy, stopping to scrape down the sides a few times. 
  • If you’d like to make your dressing thinner, add a little more milk/water. Enjoy!!!

Store and Shelf Life of Taco Dressing:
  • Because this dressing contains dairy products, it won’t last as long as vinaigrette salad dressings. 
  • Keep it sealed in an airtight container in the refrigerator for up to one week. 
  • Do not freeze dairy-based salad dressings.

Tips, Substitute/Variation:
  • You can add Mashed Avocado pulp to make dressing creamier.
  • I’d recommend keeping it in the fridge for up to 1 week.
  • Thin the salad dressing out by adding milk until it reaches the desired consistency, and I haven’t used milk/water as we like it thick and creamy.
  • If you don’t like cilantro, then try with basil, mint, or dill. They will work well!
  • You may substitute olive oil with either rice bran oil, til oil, or canola oil.
  • You may substitute honey with either brown or white sugar.
  • It is excellent as a dressing for taco salad, on tacos themselves, or as a sauce for chicken or steak entrees.
  • It’s also an excellent dressing for Southwest pasta salads made with beans, bell peppers, corn, and other traditional Tex-Mex ingredients.
  • Add some spice to the recipe by mixing in ground cayenne pepper. Start with 1/4 teaspoon and taste after adding, increasing the amount to reach the desired heat level.

Dietary Comment:
  • The calorie count is based on a 2000 calorie diet.
  • Per serving contains 34 calories, along with 1.2 g carbohydrates, 2.91 g fats, and 0.3 g protein.
  • Portion size can always be increased or decreased depending on your health goals and activity level.
Equipment Used: 
  • I use my KOIOS 4-in-1 Multifunctional Hand Blender and Food Processor to make the creamy avocado dressing. It has a high and low pulse speed so you can make the sauce pretty smooth and silky.
  • If you make this recipe, share your food picture with hashtag #aaichisavali on Instagram and Facebook so that everyone can enjoy it too! 
  • Subscribe to my YouTube channel for Healthy, Tasty, Instant Pot, and Air fryer recipes.
  • I love it when you try my recipes and send me pictures & feedback.

Eat Healthy, Stay Healthy!!!

Wednesday, June 17, 2020

How to Make Hurigadale Chutney Pudi / Phutanyachi Chutney
Hello Foodies,
        A healthy and tasty condiment, Phutanyachi Chutney / Roasted Chana Dal Chutney, is useful as a spicy spread for toasts and sandwiches and a perfect accompaniment for your breakfast dosa, idli and the ideal side for a dal-chawal and chapati meals. When I’m in a hurry and don’t have time to make sambar or any chutney, it comes very handily. 


           Not only it spice up the idli or dosa, but it can also be used to flavor rice, or sometimes I just smear chapati with ghee and sprinkle this delicious chutney.  It can make everything flavorful in whatever it is added, and even you can pack as a side dish for picnic or vacation. This chutney is not only easy to make but also filled with protein, fiber, and other essential vitamins and minerals. 

Video Recipe:

What is Dry Chutney Powder?
             Dry Chutney Powder, also known as Pudi or Podi, is a quintessential condiment in a South Indian kitchen. These chutneys make a great accompaniment to any meal, adding a unique taste and aroma. Chutney powder tastes excellent when mixed with ghee or yogurt.


Some more Dry Chutney Recipes to Try:
Preparation & Cooking Time: 15 Minutes.
Each Serving(1 Tbsp) of Phutanyachi Chutney Contains 30 Cal.

Ingredients:
  • Roasted Chana Dal(Phutanyachi dal) ½ Cup
  • Dry coconut / Desiccated Coconut ¼ cup
  • Coriander seeds 1 Tbsp
  • Cumin seeds 1 Tbsp
  • Curry leaves 20-25 
  • Tamarind 10 g
  • Red chili powder 1 Tbsp 
  • Asafoetida ¼ Tsp
  • Fenugreek seeds/Powder ¼ Tsp
  • Salt to taste
Instructions:
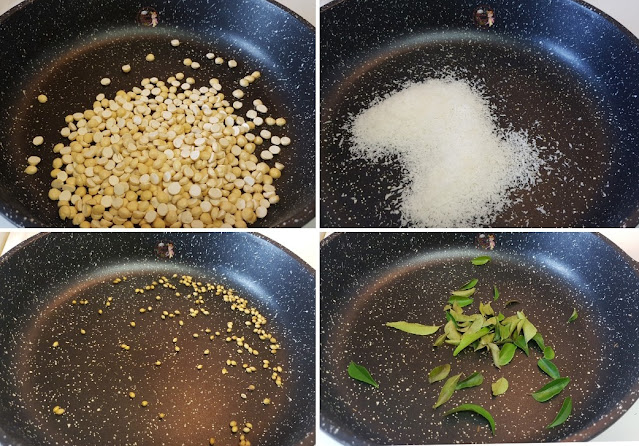
  • Heat a pan on medium to low flame. 
  • Dry roast chana dal for 3-4 minutes on medium to low flame.
  • Dry roast coconut for 2-3 minutes(or until it becomes light brown) on medium to low flame.
  • Dry roast coriander and cumin seeds for a minute on medium to low flame.
  • Dry Roast curry leaves until it becomes crisp or crunchy.
  • Once done, turn off the flame and let the roasted ingredients cool completely before grinding.
  • Now add roasted chana dal, coconut, cumin-coriander seeds, curry leaves, into the grinder jar.
  • Add Salt, Red chili powder, tamarind, fenugreek seeds,  asafoetida and grind all to make a fine powder.
  • Taste it and adjust accordingly. 
  • Healthy, tasty, and aromatic Phutanychi Chutney/Chana Dal Chutney is ready to serve. 
  • Serve with dosa, idli, sandwich, or side for chapati, varan bhat. Enjoy!!!

Serving Options:
  • Serve Phutanyachi Chutney with steamed rice, ghee, and papad.
  • Mix chutney with ghee and spread on the chapati and make a roll and enjoy.
  • Use as a side or an accompaniment for meals.
  • Spread chutney on ghee roasted toast and enjoy with a cup of piping hot tea.
Tips:
  • Chutney should be a little spicy. 
  • To check if the chutney is done, hold it between your fingers; if the chutney sticks together, its done, if not, then you need to add a little more grated coconut to it.
  • Dry roast all the ingredients above separately on a low flame till it becomes aromatic.
How to Store and Shelf Life:
  • Store it in an airtight container in a cool, dry place.
  • It can stay good for up to 1-2 months.
Dietary Comment:
  • The calorie count is based on a 2000 calorie diet.
  • Per serving contains 30 calories, along with 3.8 g carbohydrates, 1.15 dietary fiber, 1.23 g fats, and 1.17 g protein.
  • Portion size can always be increased or decreased depending on your health goals and activity level.

Good Time To Eat:
           It is good to eat Phutanyachi Chutney for breakfast, lunch, brunch, or dinner.
  • If you make this recipe, share your food picture with hashtag #aaichisavali on Instagram and Facebook so that everyone can enjoy it too! 
  • Subscribe to my YouTube channel for Healthy, Tasty, Instant Pot, and Air fryer recipes.
Eat Healthy, Stay Healthy!!!