Friday, January 28, 2022

How to Make Aloo Samosa in the Air Fryer

Hello Foodies,

        Who does not love crispy and yummy snacks along with a piping hot tea/coffee in this winter season? I gave a healthy twist to this deep-fried samosa and air-fried them. 

Making samosa at home is an extremely simple and easy recipe to follow and worth the effort. These crispy and yummy veg samosas can be great as snacks/starters/ appetizers. 

Video Recipe:

Preparation Time: 20 Minutes; Cooking Time: 15 Minutes.

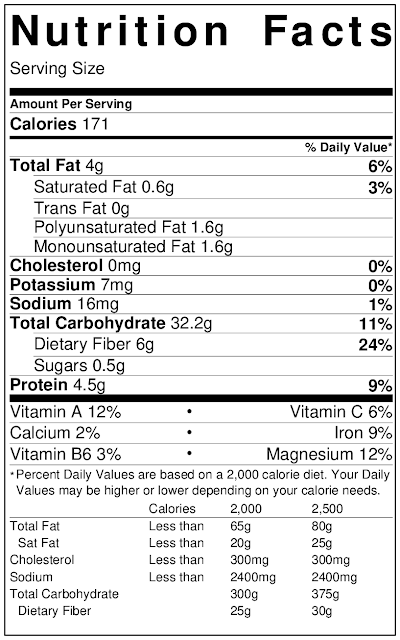
Each Samosa Contains 151 Cal.

Ingredients:

To Prepare the Dough:

  • 1 ½ Cup All-Purpose Flour/Maida 
  • ½ Tsp Salt
  • ½ Tsp Carom Seeds
  • 1 Tbsp Milk Powder(you may use baking powder 1 Tsp)
  • 1 Tbsp Ghee/Butter, melted
  • Oil to grease the dough
  • Water to knead the dough

To Prepare Stuffing For Samosa: 

  • 2 Tsp Oil 
  • ½ Tsp Cumin Seeds 
  • 2 Strips Green Chillies, finely chopped
  • 1 Tsp Ginger Paste 
  • ½ Cup Green Peas
  • 2 Potatoes, boiled, peeled, and mashed
  • ½ Tbsp Red Chili Powder 
  • ½ Tsp Turmeric
  • ½ Tsp Garam Masala
  • 1 Tbsp Amchur powder / Chat Masala
  • 1 Tsp Salt 
  • 2 Tbsp Coriander leaves, chopped
  • 1-2 Tbsp Milk to give a Milk wash

Instructions:

To Make the Dough for Samosa:

  • In a bowl add all-purpose flour, ghee, salt, milk powder, and carom seeds and mix well.
  • Add water and knead to make a firm yet pliable dough. 
  • Apply some oil and cover and keep aside for 15-20 minutes.

To Make the Stuffing for Samosa: 

  • Heat oil in a pan and add splutter cumin seeds. 
  • Now, add green chilies, ginger paste, green peas, and sauté for 2-3 minutes.
  • Add red chili powder, coriander powder, garam masala, turmeric powder, salt, dry mango powder(amchur powder), and mix well.
  • Now, add boiled, cubed/mashed potatoes, coriander leaves, and sauté for another 2-3 minutes.
  • Cool completely, mash slightly, divide the stuffing into equal portions and keep aside.

To Stuff and Seal Samosas:

  • Divide the dough into equal portions and roll out each portion into 5-6 inch diameter circles.
  • Divide each circle into 2 halves.
  • Apply some water at the edges and bring the edges together(as shown in the video) to make a cone.
  • Stuff each cone with about 2-3 tbsp of prepared potato stuffing, apply some water at the edges and seal the edges of samosa(make a plate as shown in the video).
  • Repeat the same procedure to make the remaining samosas.

To Fry Samosas in Air Fryer:

  • Preheat the air fryer at 370°F for 3 minutes and grease a pan with cooking oil.
  • Place prepared samosas into the oil greased pan and give it a milk wash(you can use egg instead of milk).
  • Air Fry samosas for 15 Minutes or until it becomes golden brown color (flip them after 7-8 minutes).
  • Crispy and tasty aloo samosas are ready to serve, serve with samosa chutney or tamarind-date chutney. Enjoy!!!

Serving Options:

  • Serve piping hot samosas with any tangy and sweet Indian dip or chutney like Coriander Chutney
  • Mint Chutney
  • Sweet Tamarind-Date Chutney and relish eating with piping hot tea.

How to Prepare Samosa in advance and Store?

  • Yes! You can prepare samosas in advance freeze them for up to 3-4 weeks and refrigerate for up to 8-10 hours. 
  • Stuff samosas and place them into the Ziploc and place Ziploc bag into freeze. 
  • Take out of the freeze 6-7 hours before frying.

Here are some more Air Fryer Recipes to Try:

  • Air Fryer Hara Bhara Kebabs
  • Air Fryer Pipe Fryums / Bobby
  • Panipuri in Air Fryer
  • Air Fryer Crispy Potato Fries
  • Air Fryer Roasted Chickpeas
  • Air Fryer Kale Chips
  • Air Fryer Dried Parsley
  • Air Fryer Collard Greens Rolls | Aluvadi
  • Air Fryer Snake Gourd Rings
  • Air Fryer Eggplant Chips

Dietary Comment:

  • The calorie count is based on 2000 calories.
  • Per serving contains 151 calories, along with 27 g carbohydrates, 2.2 g dietary fiber, 3 g fats, and 3.9 g protein.
  • Portion size can always be increased or decreased depending on your health goals and activity level.
  • (Please keep in mind that the nutritional information is calculated using a nutrition facts calculator. It is a rough estimate and can vary significantly based on the products used).

Good Time To Eat:

            It is good to eat samosas for snacks or as an appetizer.

  • If you make this recipe, share your food picture with hashtag #aaichisavali on Instagram and Facebook, so everyone can enjoy it too! 
  • Subscribe to my YouTube channel for Healthy, Tasty, Instant Pot, and Air fryer recipes.
  • I love it when you try my recipes and send me pictures & feedback.

Eat Healthy, Stay Healthy!!!

Thursday, January 20, 2022

How to Make Dal Dhokli in the Pressure Cooker

Hello Foodies,

          Dal dhokli is a sweet, spicy, tangy, and protein-rich instant pot meal. It is one more addition to your everyday one-pot menu. 

It tastes best when served warm or piping hot. Top with chopped coriander leaves, a sprinkle of freshly squeezed lemon juice, and lastly drizzle some ghee on top. So delightful!

Video Recipe:

Dal Dhokli is a traditional dish from Gujrati cuisine. This Gujrati dish is an Indian instant pasta with lentil soup. It is a protein-rich meal with Indian spices. As it is a Gujrati dish, it has a sweet and sour taste.

"Varan phal or Chakolya" is my favorite Maharashtrian one-pot meal. Preparations and ingredients in making Chakolya and Dal Dhokli are a little different. It has dal, whole wheat strips (sort of Indian pasta). It's a dish that you can have any time of the day. 

The dish has so many names and is cooked in various parts of the country with their local variations:

  • Dal Dhokli is a Rajasthan/ Gujarati name.
  • Dal Pithi-Bihar
  • Varan Phal- Maharashtrian
  • It is also known as Indian Pasta
Try this authentic Dal Dhokli recipe this weekend without fail. 
Preparation Time: 20 Minutes; Rolling and Cooking Time: 20 Minutes.
Each Serving of Dal Dhokli Contains 315 Calories.

Ingredients:

To Make Dal:

  • ½ Cup Toor dal/Split Pigeon Peas, rinsed and drained
  • 2 Tbsp Oil(you can use ghee too)
  • ½ Tsp Mustard seeds
  • ½ Tsp Cumin seeds
  • 1 Stick Cinnamon
  • 3 Cloves
  • 4-5 Dried Red chilies
  • ¼ Tsp Asafetida/Hing
  • 10-12 Curry leaves
  • 3-4 Green Chilies
  • 1 Tomato, chopped
  • 1 Tsp Turmeric
  • 1 Tsp Ginger, grated
  • 1 Tomato, diced
  • 1 Tbsp Red chili powder
  • 1 Tsp Coriander Powder
  • 1 Tsp Cumin Powder
  • Salt to taste
  • 1 Tbsp Jaggery
  • 2 Tbsp Peanuts
  • 4 cups water
  • ¼ Cup Coriander leaves/cilantro, chopped for garnish

To Make Dhokli:

  • 1½ Cups Whole Wheat flour 
  • 2 Tbsp Besan(Chickpea flour)
  • 1 Tsp Turmeric
  • 1 Tsp Kashmiri Red chili powder
  • 1 Tsp Coriander Powder
  • 1 Tsp Cumin Powder
  • 1 Tsp Carom Seeds
  • Salt to taste
  • 1 Tbsp Oil
  • 1 cup water or as needed

Instructions:

To Cook Dal in the Instant Pot:

  • Turn on the sauté mode of the Instant Pot and heat 2 Tbsp of oil. 
  • Splutter cumin and mustard seeds, and add cinnamon stick, cloves, green chilies, dried red chilies, curry leaves, and mix well.
  • Now add washed toor dal(Split Pigeon Peas), peanuts, tomatoes, red chili powder, turmeric, coriander-cumin powder, asafoetida, jaggery, and salt. 
  • Mix everything well.
  • Add 2 cups of water, give it a quick stir, and close the lid of the Instant Pot.
  • Place the valve in the sealing position. 
  • Pressure Cook on manual mode(Hi) for 5 minutes followed by Natural Pressure Release.

To Make the Dhokli:

  • In a mixing bowl add whole wheat flour, besan, salt, carom seeds, red chili powder, turmeric, coriander-cumin powder, asafoetida, salt to taste, and 1 Tsp oil. 
  • Mix everything well.
  • Use water as needed to make a firm yet pliable dough.
  • Add oil and knead the dough well.
  • Cover and keep aside for 5-10 minutes.
  • Using flour, roll the dough balls into 10-12 inch thin circles.
  • Using a knife, cut each rolled circle into 1-inch squares or dhoklis. 
  • Put the cut dough pieces on a plate. 

To Make Dal Dhokli:

  • Open the lid of the Instant Pot after the pressure has released naturally. 
  • Turn Instant pot to sauté mode.
  • Using the back of a spatula or a  masher, mash the dal. 
  • Add 2 cups of water, mix well, and bring the dal to a gentle boil.
  • Add the dough squares to the dal and mix gently.
  • Close the lid of the Instant Pot and place the pressure valve in the sealing position.
  • Pressure Cook on Manual Mode(Hi) for 2 minutes followed by Quick Release.
  • Mix the Daal Dhokli, add ghee 1-2 Tbsp(Optional).
  • Lastly, garnish with chopped coriander leaves. 
  • Healthy and soothing Dal Dhokli is ready to serve.  Enjoy!!!

Tips:

  • If needed add water and adjust the consistency of dal as required(The dal thickens once cooled).
  • You can cut the dhokli in diamond or square shapes.
  • Adding jaggery will enhance the flavor of dal, so don't skip adding it.
  • To make dal dhokli healthier you can add veggies like spinach, carrots, peas, beans, etc.
  • The dal for Dal Dhokli should be watery. The dough will absorb the water and thicken the dal.

Dietary Comment:

  • The calorie count is based on 2000 calories.
  • Per serving contains 315 calories, along with 37.1 g carbohydrates, 8.1 g dietary fiber, 15 g fats, and 12.3 g protein.
  • Portion size can always be increased or decreased depending on your health goals and activity level.
  • (Please keep in mind that the nutritional information is calculated using a nutrition facts calculator. It is a rough estimate and can vary significantly based on the products used).

Some More Instant Pot Recipes to Try:

Good Time To Eat:

           It is good to eat Dal Dhokli for lunch, brunch, or for dinner.

  • If you make this recipe, share your food picture with hashtag #aaichisavali on Instagram and Facebook, so everyone can enjoy it too! 
  • Subscribe to my YouTube channel for Healthy, Tasty, Instant Pot, and Air fryer recipes.
  • I love it when you try my recipes and send me pictures & feedback.

Eat Healthy, Stay Healthy!!!

Monday, January 17, 2022

How to Make Hara Bhara Kebabs in the Air Fryer

Hello Foodies,

          If you're looking for a quick, healthy, and easy breakfast, these air fryer kebabs are just the ticket.

Air Fryer Hara Bhara Kebabs are a fast way to get a quick meal on the table! Crispy from the outside and soft inside, vibrant and healthy kebabs are easy to make in the Air Fryer with less muss and fuss with all of the flavor. Even frozen patties/kebabs turn out tasty with just a little extra cook time!

Video Recipe:

While your trusty air fryer is a go-to for sides and appetizers like Banana Chips, Air Fryer Tandoori Chicken, Air Fryer Coconut Shrimps, and Chicken Burger, did you know you can air-fry kebabs, too? In about 10 minutes or so, you can have breakfast on the table, making these quick air fryer Hara Bhara Kebabs perfect for busy weeknights.

They do not disappoint on flavor, and best of all, you can enjoy all the winter veggies. They are done so quickly in the air fryer, and the kebabs come out juicy and flavorful. I made these kebabs in my GoWise USA 5.8 Qt Air Fryer. This air fryer has a basket, but if you have an air fryer with trays, they will work too.

Preparation Time: 10 Minutes; Cooking Time: 10 Minutes.
Each Serving of Hara Bhara Kebabs Contains 63 Cal.

Ingredients:

  • Spinach 1 cup, blanched
  • Potato 1, boiled and mashed
  • Green peas ¼ cup
  • French beans ¼ cup
  • Green pepper ¼ cup
  • Ginger paste ½ Tsp
  • Green chilies 3 strips, chopped finely
  • Coriander leaves 2 Tbsp, chopped
  • Garam Masala 1 Tsp
  • Chat Masala 1 Tbsp
  • Gram flour/chickpeas flour/besan 2 tbsp(dry roasted)
  • Bread crumbs 2 Tbsp
  • Salt to taste
  • Oil 1 Tsp
  • Cashews for garnishing

Instructions:

To Make Kebabs/Patties:

  • Heat ½ Tsp oil in a pan and add ginger and chopped green chilies and saute for a few seconds.
  • Now add beans, green pepper, green peas and cook for 2-3 minutes.
  • In a grinder add spinach(blanched), cooked peas, pepper, and beans, and grind it to make a paste.
  • Now, in a bowl add veggies paste, mashed potato, garam masala, salt, chaat masala, coriander leaves, dry roasted besan, bread crumbs, and mix well.
  • Divide the mixture into equal portions and make patties or give them a desirable shape.
  • Roll the kebabs in the bread crumbs(optional), coat them evenly on all the sides.
  • Place cashew at the center and press slightly.

To Air Fry Kebabs:

  • Preheat Air Fryer at 370F for 3 minutes.
  • Grease Air Fryer’s basket with oil.
  • Place prepared patties into the basket and spray some oil.
  • Close the air fryer’s basket.
  • Air Fry at 370 F for 10 minutes.
  • Crispy and healthy Hara Bhara Kebab is ready to serve. 
  • Serve hot with ketchup as an appetizer/snacks/breakfast. Enjoy!!!

My Take:

  • Keep the prepared batter in the fridge for 10-15 minutes for better results.
  • To make it gluten-free use oats instead of bread crumbs.
  • To make it nuts free skip garnishing with cashews.
  • Every Air Fryer is different, so check your kebabs early to ensure they don’t overcook.

Here are some more Air Fryer Recipes to Try:

Dietary Comments:

  • The calorie count is based on a 2000 calorie diet.
  • Per serving contains 63 calories, along with 8.39 g carbohydrates, 3.12 g fats, and 2.1 g protein.
  • Portion size can always be increased or decreased depending on your health goals and activity level.
  • (Please keep in mind that the nutritional information is calculated using a nutrition facts calculator. It is a rough estimate and can vary significantly based on the products used).

Good Time To Eat:

           It is good to eat as snacks or for breakfast.

  • If you make this recipe, share your food picture with hashtag #aaichisavali on Instagram and Facebook, so everyone can enjoy it too! 
  • Subscribe to my YouTube channel for Healthy, Tasty, Instant Pot, and Air fryer recipes.
  • I love it when you try my recipes and send me pictures & feedback.

Eat Healthy, Stay Healthy!!!

Saturday, January 8, 2022

How to Make Kerala Parotta(Malabar Parotta)

Hello Foodies,

          Is there anything more tempting than a flaky Kerala Parotta? Crispy on the outside and super soft on the inside. 


These flaky, layered, soft, and fancier Malabar parottas are made from all-purpose flour. You can make it using just wheat flour also but then it won't be any different from a lachha parantha. Or you can use 1:1 all-purpose flour and whole wheat flour. While making these parottas either you can use oil, ghee, or butter in their preparation. The parotta is made with layers so while you are going to serve them, you can squeeze the parotta with your hands so that the layers come up together.

Video Recipe:

     The dough for parotta is beaten into thin layers and later forms a round spiraled into a ball using these thin layers. The ball is rolled flat and pan-fried. Porottas/ Parathas are commonly eaten with vegetable kurma/korma, chicken, fish, mutton, or any veg curry. How about some Parotta and veg. korma? or chicken curry? What is your favorite parotta combo?

If you like to try the delicate authentic veg korma recipe, you can find it here. It's a must-try curry recipe. Enjoy its authentic taste with this Kerala parottas. 

Preparation Time: 30 Minutes; Cooking Time: 20 Minutes.
Each Kerala Parotta Contains 275 Cal.

Ingredients:

  • 3 Cups Maida(all-purpose flour) and extra flour to use for dusting 
  • ¼ Tsp Baking Powder
  • 1 Tbsp Milk Powder 
  • 1 Tbsp Sugar
  • 1 Tsp Salt
  • 1 Tbsp Yogurt(Dahi)
  • 1 Tbsp Ghee
  • 3 Tbsp oil
  • 1 Cup Lukewarm Milk to knead the dough(you can use water too)

Instructions:

To Make the Dough for Parottas:

  • In a mixing bowl add all-purpose flour(Maida), sugar, salt, baking powder, milk powder, yogurt, and ghee, and mix all well.
  • Add milk and knead to make a smooth dough.
  • Apply oil to the dough.
  • Cover and rest the dough for 15-20 minutes.

To Roll the Parottas:

  • Divide the dough into equal portions, roll to balls, and rest for 5-10 minutes.
  • Apply oil to each dough ball and using a rolling pin, roll out to a paratha.
  • Apply oil to the rolled parotta, and sprinkle some flour.
  • Using a knife/pizza cutter cut the rolled parotta into thin strips.
  • The stripes are gathered together and rolled to make a ball.
  • Now, roll the spiral balls into a 6-inch circle.

To Cook/Roast the Parathas:

  • Heat a pan/tawa over medium-high heat and transfer the parotta into the hot pan.
  • Add some oil and cook on medium heat cook till brown spots appear on the lower side.
  • Flip the paratha.
  • Apply oil on both sides and cook till brown spots darken.
  • Apply little pressure while cooking using the back of a ladle.
  • Remove the paratha from the pan. When it is slightly warm, use both palms to puff out the layers.
  • Once it is cooked properly, it is pressed from both sides, so that the layers get separated from each other.
  • Flaky, layered, and soft Kerala parottas are ready to serve.
  • Serve Kerala parottas with Veg. Korma or with your favorite curry. Enjoy!!!

Tips:

  • Adding baking powder will make for the softest parottas.
  • Do not apply a lot of oil when rolling as it will become slippery and difficult to roll. 
  • Rest the spiral dough on the plate for 5-10 minutes.
  • If you want a really flaky parotta, spread little oil on the spread dough.
  • Milk and milk powder add richness to the parotta.

How to Store/Freeze the Kerala Parotta:

  • Parottas can be frozen easily. 
  • Roll and cook parottas from both sides.
  • Now remove the pan and let them cool. 
  • Place a parchment paper over each parotta and stack them over each other.
  • Keep the stack in a ziplock and freeze the parotta for 2-3 months.
  • When ready to use, microwave for 30-35 seconds and then cook it on a hot griddle.
  • Cook until browned and flaky.

Some Other Indian Flatbreads to Try:

Dietary Comment:

  • The calorie count is based on 2000 calories.
  • Per serving contains 275 calories, along with 42.1 g carbohydrates, 1.4 g dietary fiber, 8.1 g fats, and 7 g protein.
  • Portion size can always be increased or decreased depending on your health goals and activity level.

Good Time To Eat:

           It is good to eat Kerala Parotta for lunch, brunch, or dinner.

  • If you make this recipe, share your food picture with hashtag #aaichisavali on Instagram and Facebook, so everyone can enjoy it too! 
  • Subscribe to my YouTube channel for Healthy, Tasty, Instant Pot, and Air fryer recipes.
  • I love it when you try my recipes and send me pictures & feedback.

Eat Healthy, Stay Healthy!!!

Wednesday, January 5, 2022

How to Make Ajwain Paratha

Hello Foodies,

         Ajwain, or carom seeds, are very common in Indian households. The aromatic seeds are used in adding flavor to a number of Indian drinks, curries, and even to make parathas. The leaves have a number of uses and can be added to dishes of your choice to add a distinctive flavor and taste to them.

Ajwain leaves have a bitter and pungent taste. The leaves are broad, succulent, tender, and soft with an astringent taste from the juice when it is chewed raw. 

Video Recipe:

            These flaky parathas are made with whole wheat flour and flavored with carom /ajwain leaves paste. They are easy to make and pair well with many Indian sides dishes. There is another way of making these flatbreads where the ajwain leaves are replaced with carom seeds are mixed with the dough. These ajwain parathas are flaky and roasted on a hot tava and then on the Stainless Steel Wire Roaster. Once roasted apply some ghee, which will keep the paratha softer. 

Uses and benefits of Ajwain leave:

  • Use to make fritters/pakoras, a tea time snack
  • Use to make chutneys, raita, salads, and healthy juices

How to pluck and clean Ajwain leaves?

  • Pluck or separate the leaves from the stems.
  • Wash plucked leaves 3 to 4 times to remove the dirt and pat dry them using a kitchen towel.

Some Other Indian Flatbreads to Try:

Preparation Time: 10 Minutes; Cooking Time: 15 Minutes.
Each Methi Paratha Contains 171 Cal.


Ingredients: 

To Make Ajwain Paste/Chutney:

  • Ajwain leaves 12-15
  • Green Chilies 3-4 
  • Coriander leaves and stems ¼ Cup
  • Ginger Paste 1 Tsp
  • Salt to taste
  • Lemon Juice 2 Tbsp
  • Water if needed

To Make the Dough for the Parathas:

  • Whole Wheat Flour 2 Cups
  • Salt to taste
  • Red chili powder 1 Tbsp
  • Prepared Ajwain Paste
  • Oil 2 Tsp

Instructions:

To Make Ajwain Paste/Chutney:

  • Wash and pat dry ajwain leaves.
  • In a grinder jar add green chilies, coriander leaves and stems, ginger paste, salt, lemon juice, and grind to make a paste(if needed add water to make a paste).
  • Ajwain paste/chutney is ready to make parathas dough.

To Make the Dough for the Parathas:

  • In a mixing bowl add whole wheat flour, salt, red chili powder, mix all well.
  • Now add prepared ajwain paste and knead to make a soft dough.
  • If needed add water and make a soft dough.
  • Apply oil, cover, and keep the dough aside for about 10 to 15 minutes to set.

To Roll, and Roast the Ajwain Parathas/Phulka:

  • Divide the dough into equal portions and roll each portion to make a dough ball. 
  • Now, roll the dough ball into the flour (so that it doesn’t stick to the rolling pin) and roll it gently in a circular motion to form a circular shape.
  • Make it of even thickness from all around.
  • Meanwhile, heat a tawa on medium-high heat.
  • Once the tawa is hot, transfer the paratha to the hot tawa and cook until brown spots appear on the base of the paratha.
  • After 30 seconds, turn the paratha and keep the tawa on a higher flame(roast from another side for 20 seconds).
  • Now, remove the tawa and keep the roasting grill(High heat) and transfer the paratha on the rack/grill.
  • Turn the paratha once it puffs up and has a few light brown spots.
  • Once done, remove the puffed paratha from the grill(you can use a tong to remove it).
  • Apply some ghee(it's totally optional), but ghee will keep the paratha softer.
  • Soft and healthy ajwain parathas are ready to serve, hot with Pickle, Sesame Chutney, Curd. or any curry. Enjoy!!!

Dietary Comment:

  • The calorie count is based on 2000 calories.
  • Per serving contains 171 calories, along with 32.2 g carbohydrates, 6 g dietary fiber, 4 g fats, and 4.5 g protein.
  • Portion size can always be increased or decreased depending on your health goals and activity level.

Good Time To Eat:

       It is good to eat Ajwain Paratha for breakfast, lunch, or dinner.

  • If you make this recipe, share your food picture with hashtag #aaichisavali on Instagram and Facebook so that everyone can enjoy it too! 
  • Subscribe to my YouTube channel for Healthy, Tasty, Instant Pot, and Air fryer recipes.
  • I love it when you try my recipes and send me pictures & feedback.

Eat Healthy, Stay Healthy!!!

Saturday, January 1, 2022

How to make soft, melt-in-the-mouth, Homemade Gulab Jamun from Scratch

Hello Foodies,

          Gulab Jamun is a very popular and absolutely delicious Indian dessert. Another year of adding a little sweetness! 

The sugar syrup for gulab jamun is flavored with cardamom, saffron, and then fried mawa+flour dough balls soaked in the sugar syrup, hence the term Gulab Jamun. It is made traditionally with dried milk solids. These dried milk solids are also called khava, khoya, or mawa. 

Video Recipe:

Hot Gulabjamun with chilled Icecream, Golabjamun with Gajar Halwa, Gulabjamun with Sweet Boondi(Diljamai), Gulabjamun Cake jars is the best combinations that I have ever tried! Have you ever tried any one of them? How do you prefer your Gulab Jamun, Hot or Cold? Let me know your favorite combination. 

Ingredients:

To Make Gulab Jamun:

  •  1 ½ Cups Khava/Khoya/Mawa, grated or crumbled
  • ½ Cup All-purpose flour/Maida
  • 2 Tbsp Semolina/Rava
  • ½ Tsp Baking powder
  • 1 Tbsp Ghee
  • ¼ Cup Milk, add little at a time, use more if needed
  • Ghee or Oil for frying
  • Almonds, Pistachios sliced, Rose Petals to garnish

To Prepare Sugar Syrup:

  • Sugar 2 Cups
  • Water 2 Cups
  • Saffron few strands
  • Cardamom Powder 1 Tsp
  • Lemon Juice 1 Tbsp

Instructions:

To make the dough for the Gulabjamun:

  • In a bowl, add grated khoya, rava(semolina), baking powder, all-purpose flour(maida), and mix it well.
  • Now add milk a little at a time, so the dough starts to form(We don't want the dough to be sticky, so add enough milk for it to come together). 
  • Knead and make a smooth and soft dough.
  • Cover with a damp cloth and let the dough rest for 10-15 minutes.
  • After 10-15 minutes, grease palms with some ghee. 
  • Make small balls from the dough and make sure the dough balls are smooth and crack-free, else they might break when frying. 
  • Squeeze the dough between your palms to make it smooth and crack-free(If there are cracks, add a few drops of milk to make it smooth).
  • Make equal-sized balls.

To Fry the Gulabjamuns:

  • Meanwhile, heat oil/ghee in a kadhai/pan.
  • Add 5-6 dough balls in the hot oil and keep stirring and frying.
  • Fry on medium to low flame until it turns golden brown.
  • Once fried place them on the plate and fry the remaining dough balls.

To Make Sugar Syrup:

  • In a pan add 2 cups of sugar and 2 cups of water and let it boil for 5-6 minutes.
  • Now, to the syrup add cardamom powder, saffron strands, and lemon juice mix well.
  • Turn the flame off and sugar syrup is ready to soak the Gulab Jamun.

To Soak the Gulabjamun in the Sugar Syrup:

  • Add fried Gulab Jamun to the sugar syrup while the syrup is warm, so they soak in all the sweetness and become soft. 
  • Soak the Gulab Jamun for at least 30 minutes before enjoying it. 
  • Soaking for up to 4- 5 hours works great too.
  • Once cooled garnish it with almonds, pistachios, and rose petals.
  • Here, soft, melt in the mouth, and delightful Gulab Jamuns are ready to Enjoy!!!

Tips to Make Khavyache Gulab Jamun:

  • If the shape of Gulab Jamun not coming means add a little amount of milk to your palm and make a ball.
  • If the syrup is too hot, the balls might break. If it is cold, then the balls will not soak the syrup well.
  • If the syrup thickens means Jamun will not absorb the syrup as required.
  • The balls were fried on high heat, which can make them hard from the outside and uncooked from the inside.

Some More Indian Desserts to Try:

Good Time To Eat:

             It is good to eat khavyache gulab jamun as a dessert.

  • If you make this recipe, share your food picture with hashtag #aaichisavali on Instagram and Facebook, so everyone can enjoy it too! 
  • Subscribe to my YouTube channel for Healthy, Tasty, Instant Pot, and Air fryer recipes.
  • I love it when you try my recipes and send me pictures & feedback.

Eat Healthy, Stay Healthy!!!