Tuesday, April 30, 2019

How to Make Bitter Gourd / Karela Chips in Air Fryer
Hello Foodies,
              Crispy, simple, and non-fried bitter gourd recipe that can simply go well with the chapati(roti), brown or white rice, Millets, or even taste best if eaten as it is. This is a super healthy and diabetic friendly recipe, there is no usage of any sugar, jaggery, yogurt, or tamarind as well. Probably it's the way the bitter gourd fry is prepared that lends that unique taste. 
             Though Bitter Gourd is not all of our favorite veggies, try this way tasty recipe, and it will bring a unique flavor to the table. Serve it with hot chapati, and you will prepare it again and again. I have never been a fan of this bitter gourd until I ate this bitter gourd Fry dish, made by my SIL. She is best at cooking like my mother. I ate a few years back the first time, and now I am totally loving it, preparing it once or twice a week and yes I can say I love this bitter veggie a lot. Even when McDreamy tried it the very first time and he liked it too. So guys try this out, you would also love if you have any wrong impression about bitter gourd. Marinating Bitter Gourd slices in salt and lemon juice makes it less bitter. And the addition of onions and spices makes it tasty. Air frying lowers the fat intake and makes bitter gourd crispier. 
            You can eat this bitter gourd fry for any meal and can serve within pita bread, sandwiches, or as asides like fries. So give this healthy veggie a try, and I hope you will enjoy it!

Ways to consume Bitter Gourd:
  • This healthy veggie can be consumed in the form of juice
  • Can be added in a smoothie with apples and banana.
  • You can also have it as a soup.
  • Also in the form of baked chips.
  • Make parathas from it.
  • Turn it into a chutney and pickle.
Preparation Time: 5 Minutes; Cooking Time: 18 Minutes.
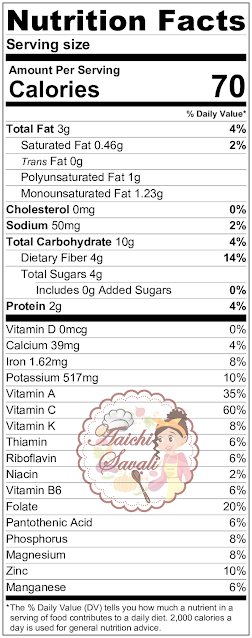
Each Serving of Bitter Gourd Stir Fry Contains 70 Calories.

Video Recipe: 
Ingredients:
  • Karela/Bitter Gourd 4
  • Onion 1 small, Chopped
  • Red chili Powder 1 Tbsp
  • Turmeric 1 Tsp
  • Salt 1 Tsp
  • Lemon Juice 2 Tbsp
  • Coriander leaves 2 Tbsp, chopped
  • Veg.oil 1 Tsp
Instructions:
To Marinate Bitter Gourd:
  • Wash, trim on both the ends as needed, and thinly slice bitter gourd (refer video) and discard any seeds if it's there.
  • Add sliced bitter gourd into mixing bowl and add salt, lemon juice.
  • Mix well, cover and keep aside for 15 Minutes.
  • After 15 Minutes, squeezed out excess water from the bitter gourd.
To Air Fry Bitter Gourd:
  • Meanwhile, preheat Air fryer at 370F for 3 minutes and grease air fryer safe pan with cooking oil spray.
  • Add bitter gourd into the pan and insert pan and air-fry for 12 minutes, turn or mix after 5-6 minutes.
  • Air Fry until it becomes crispy and brown color.
To Prepare Bitter Gourd Stir Fry:
  • Meanwhile, heat 1 Tsp oil in a pan and fry sliced onions until it becomes brown color.
  • Now add bitter gourd, red chili powder, turmeric and mix well and cook for 2-3 minutes
  • Add chopped coriander leaves and mix well and bitter gourd fry is ready to serve, serve hot with chapati or with rice. Enjoy!!!
My Take:
  • Browning bitter gourd and onion brings the taste to this dish, so don't skip this step.
  • Using lemon is important for taking out the bitterness.
  • If you like, then you can add tamarind juice or yogurt instead of lemon juice. It will work the same.
  • Also, you can saute sliced bitter gourd with some Olive oil, that will help to reduce bitterness and mix with other veggies.
Dietary Comment:
  • The calorie count is based on a 2000 calorie diet.
  • Per serving contains 70 calories, along with 10.5 g carbohydrates, 4.4 g dietary fiber, 3.2 g fats, and 1.9 g protein.
Health Benefits of Bitter Gourd Fry:
  • It boosts weight loss and helps in controlling diabetes.
  • It's low in calories, fat, and carbohydrates.
  • It also improves metabolism.
  • It is an excellent source of dietary fiber which favors digestion and nutrient absorption.
  • Regular consumption of bitter gourd contributes to relieving constipation and indigestion.
Good Time To Eat:
           It's good to eat Bitter Gourd Stir fry for lunch, snacks, and dinner.
  • If you make this recipe, share your food picture with hashtag #aaichisavali on Instagram and Facebook so everyone can enjoy it too! 
  • Subscribe my YouTube channel for Healthy, Tasty, Instant Pot, and Air fryer recipes.
Eat Healthy, Stay Healthy!!!

Monday, April 29, 2019

Hello Foodies,
          This 20 minutes one pot chicken keema peas pulao is epic, rich, instant and easy to prepare. Using instant pot this keema-peas pulao is crazy simple to make. I really can't think of a better way to serve this than with the raita. You are just 10 minutes away from this heavenly chicken dish. This is one of my husband's favorite ground chicken dish. This one pit entree is super easy and tasty. I have just added some peas, onion, and tomatoes with rice and chicken to make it into a great meal. If you have some leftover chicken broth, you can add instead of water. If you are in a crunch for an easy weeknight dinner, this last minute chicken keema-peas pulao is what you need! Since chicken is my husband's favorite proteins, I always keep it stocked in my freezer. This pulao ready in 10 minutes and goes perfectly with just raita. Sometimes I do add a little more Spinach, mushrooms or bell pepper. Also if you don't have Fresh potatoes, you can use canned tomatoes too. This chicken keema-peas pulao is filled with so much flavor, ready and on your table in 15 minutes. A healthy ground chicken keema-peas pulao recipe with simple ingredients and no flour. This dish is packed with protein and pretty good to taste. This Indian ground chicken pulao recipe tastes as close to authentic Indian food as you can cook in your kitchen. It's spicy, salty and fresh. An absolute must try.

               Instant pot meals have become my go-to on busy weeknights! Here are more of my family's favorites Chicken recipes:

Chicken Keema-Pav:

Chicken Biryani:

Chicken Tikka Masala:

Butter Chicken:


Preparation Time: 10 Minutes; Cooking Time: 10 Minutes.
Each Serving of Chicken Keema-Peas Pulao Contains 330 Calories.

YouTube Video:

Ingredients:

  • Chicken keema (250 g)
  • Basmati Rice 1 Cup
  • Green peas ¼ Cup
  • Onion 1 medium, chopped
  • Tomatoes 2 medium, chopped
  • Ginger-Garlic paste 1 Tbsp
  • Red chili powder 1 Tbsp
  • Turmeric powder 1 Tsp
  • Biryani-Pulao Masala 1 Tsp
  • Salt 1 Tsp
  • Cinnamon 1” stick
  • Bay leaf 1
  • Cloves 3 
  • Anise star 1
  • Shahjeera 1 Tsp
  • Coriander leaves 2 Tbsp, chopped
  • Ghee / Oil 2 tbsp


Instructions :

  • Wash rice under tap water and keep aside. 
  • Turn on sauté mode of the instant pot and heat ghee.
  • Add anisstar, bay leaf, cinnamon, and shahjeera and let it splutter.. 
  • Now add chopped onions saute for and cook for 2 to 3 minutes or until the onions start to turn brown.
  • Add tomatoes and ginger garlic paste and cook for a minute.
  • Add red chili powder, turmeric, salt, and pulao masala and mix well.
  • Now add green peas, ground chicken and mix well.
  • Add rice, coriander leaves and mix well and add 1 ½ cup of water and mix well.
  • Close the lid, place the vent on sealing position and cook on manual mode(Hi) for 5 minutes.
  • NPR for 5 minutes, then move the valve to release any remaining pressure. 
  • Open the lid, mix the rice, and garnish with coriander leaves
  • Serve chicken keema pulao with raita, curd or with any curry. Enjoy!!!


My Take:

  • You can add veggies of your choice.
  • According to your taste add red chili powder more or less.

Dietary Comment :

  • The calorie count is based on a 2000 calorie diet.
  • Per serving contains  330 g calories, along with 38 g carbohydrates, 11.9 g fats, and 17 g protein.

Good Time To Eat:

  •            Eating Chicken Keema-Peas Pulao for lunch and dinner is excellent.

If you make this recipe, share your food picture with hashtag #aaichisavali on Instagram and Facebook so everyone can enjoy it too! 
Subscribe my YouTube channel for Healthy, Tasty, Instant Pot and Air fryer recipes. 

Eat Healthy, Stay Healthy!!!

Thursday, April 25, 2019

Namaskar Mandali,
            When I was Kid, Aamras-Puran Poli and summer vacations were my favorites. And I am sure it's all kids favorite too! Who doesn't like Mangoes? Everyone does love this King of Fruits “Mango.” Beyond the Sweet, luscious taste of mangoes, they also contain an abundant amount of minerals, vitamins, and antioxidants.


Aamras, Aam means mango and ras means juice, so basically Aamras means mango juice or pulp which flavored with saffron, cardamom as your liking. So preparing aamras at home is always the best and easiest or last minute dessert idea. You just need to put all ingredients into the grinder and grind to make smooth puree and Viola! Creamy and yummy Aamras is ready. Chill before serving and serve chilled with puranpoli, puri, chapati or enjoy as it is. There are different flavored Aamras in every region in India. You can add cardamom powder, saffron or ginger powder to flavor Aamras. Also top it with homemade ghee(sajuk tup), which will help to easy digestion. Also, the addition of saffron strands takes it to a different level. 
                   Consuming fruits and vegetables or increasing consumption of plant-based foods decreases the risk of obesity, heart diseases, diabetes and promotes healthy hair and complexion, increase energy. Mangoes are one of them and can help protect, strengthen and boost the immune system. Mangoes are high in antioxidants, dietary fibers that may help to improve digestive health. 

Which Mangoes I have used to Prepare Aamras
         I have used riped Alphonsos to prepare this yummy dessert. This Alphonso Mango is one of the best variety of mango found in India in terms of sweetness and flavor. If you have Payari, Kesar, Badami, or any other varieties you can use it to prepare Aamras. According to the taste of Mangoes and your liking add sugar, water or milk and to flavor add cardamom or saffron or ginger. 
         Also, learn to not judge the ripeness of a Mango by its color. Look for fresh Mangoes that yield slightly to pressure when ripe. Avoid fruits with many black freckles on the skin. 


Check out my other Mango recipes here:

Mango Sheera: https://www.aaichisavali.com/2019/03/Mango-Rava-Kesari.html

Mango Lassi: https://www.aaichisavali.com/2019/03/how-to-make-mango-lassi-sweet-lassi.html

Mango Panna Cotta(Vegan): https://www.aaichisavali.com/2017/08/how-to-prepare-vegan-mango-panna-cotta.html

Mango Popsicles: https://www.aaichisavali.com/2019/03/Mango-Lassi-Popscile.html

Preparation Time: 10 Minutes.
Each Serving of Aamras Contains 100 Calories.


Ingredients:

  • Mango pulp 250 g
  • Sugar 2 Tbsp
  • Saffron few stands + 2 Tbsp warm water
  • Milk / Water ¼ Cup


YouTube Video:

Instructions:

  • Rinse the mangoes and slice off the upper end.
  • Slice a piece of mango and then cut into small pieces and remove the pulp.
  • Add mango pulp, saffron+water, and sugar blend it till get a smooth puree.
  • Now add milk and blend again and Amaras is ready to serve. 
  • Chill prepared Aamras for 1-2 hours into the fridge and serve chilled with Puran poli or puri or with chapati. Enjoy!!!


My Take: 

  • If the mangoes you are using to prepare Aamras are sweet, then you need no sugar or less sugar.
  • If your Mangoes are sour, then you will need more sugar.
  • You can skip the addition of milk, or you can add water instead of milk it's up to your liking.
  • You can use cardamom Powder or ginger Powder to flavor it.


Dietary Comments:
The calorie count is based on a 2000 calorie diet.
Per serving contains 70 calories, along with 6 g carbohydrates, 4.5 g fats, and 3 g protein.

Health Benefits of Aamras:
  • It has antioxidants and anti-inflammatory properties.
  • Good source of dietary fibers that may help to improve digestive health. 
  • It contains a good amount of potassium and magnesium and which are an excellent remedy for high blood pressure.
  • It is an excellent source of vit.K and its essential for improving calcium absorption, essential for bone health.
  • It's High in fiber and water content that help to prevent constipation and promote regularity and a healthy digestive tract.
  • It is one of the Sweet fruit with a high amount of natural sugar.


Good Time To Eat:
           It's good to eat Aamras as a dessert or side for chapati, puri for lunch or dinner.

If you make this recipe, share your food picture with hashtag #aaichisavali on Instagram and Facebook so everyone can enjoy it too! 
Subscribe my YouTube channel for Healthy, Tasty, Instant Pot and Air fryer recipes. 

Eat Healthy, Stay Healthy!!!

Wednesday, April 24, 2019

Hello Food Lovers,
          Trying to decide between having the crown, the name or the age or happy birthday taglines for a girl's birthday cake? Well, this fondant tiara cake topper has it ALL! This sparkly princess cake topper is most to finish off the cake. This elegant shimmering princess tiara cake topper is about 4 inches diameter and really easy to customize them. Oh, and I’ve even made a video for you that can help you well and will guide for making your tiara! Also, you need these crowns to firm and dry hard.

YouTube Tutorial


You will need:

  • White Fondant
  • Fondant rolling pin
  • Cornstarch
  • Tiara cutter
  • Edible Gold dust
  • Knife
  • Paintbrush
  • Can(you can use any can)
  • Wax paper/parchment paper
  • Tape
  • Water+lemon juice


Instructions: 

  • Tape some wax paper/parchment paper around your can you’ve chosen(I have used empty salt box here, you can use any can). 
  • Make sure it’s taped smoothly around your can and set it aside. 
  • Dust cornflour over the floor and roll out white fondant.
  • Make sure it’s not too thick, but it doesn’t need to be thin either, or it won’t stand up.
  • Now, take the tiara shape cutter and press it on rolled fondant and apply pressure with your hand or use a rolling pin to give the pressure.
  • Remove the excess fondant and use a knife to remove the intersections.
  • Wrap your crown around taped can and make sure the bottom is level with the bottom of the can all the way around the crown.
  • Let it set up just like this for at least 24 hours and then pull off the wax paper and slide the crown away from the can(Be very gentle with it).
  • Now, you can paint it. I used edible gold dust and mixed it with a bit of water and lemon extract. Just take a brush and brush over the front and back of your crown, making sure to the top edge. 
  • It’ll look streaky the first go around. Let it dry just for about five minutes and then do another coat.
  • That is it, just set aside until you’re ready to set it onto your cake. Enjoy!!!

My Take:

  • Don’t travel with the crown on top of your cake, just add it to the cake when you get to the event.
  • You can use any color to make princess tiara as you like


Eat Healthy, Stay Healthy!!!

Tuesday, April 23, 2019

Hello Foodies,
           Prepared this stuffed spinach-cheese balls by using basic ingredients. It has been a while, that I haven't posted any cheese recipe and I had some cheese left in the fridge.  So today I have prepared this stuffed spinach cheese balls.  The procedure is incredibly super easy and ingredients used are easily available in your kitchen pantry. It's brimming with cheesy and rich flavor. Once you prepare, kids will finish the plate in no time. This is my easy to go snack or appetizer cheese balls recipe. Nothing fancy and far cheaper, it's just comfort snack made with the classic mozzarella cheese, potatoes, sweetcorns, some herbs, and spinach. Here I have used mozzarella cheese, but you can use cheddar cheese too. Cheddar cheese tastes good too. In this spinach cheese balls recipe, sometimes I also add garlic powder, onion powder or some mixed herbs for flavor. But here I have shared no onion-no garlic recipe. The key to making this crispy, creamy and cheesy balls is the dough has to be tightly rolled so that cheese balls will remain firm. Also, do not to forget to freeze stuffed cheese balls for at least 15-20 minutes. This will prevent the cheese from melting and burst out while frying, air frying or baking.

            To make dough soft and to get it stickiness or for the binding purpose, I have used potatoes here, and it helps a lot. These tubers are an excellent medium for all kinds of flavors and are actually healthier than you think. Whether potatoes are boiled, fried, roasted or grilled they taste good! Also to prepare to stuff I have added sweet corns with the cheese, and it gives this cheese balls a crunchy and a bit of sweet taste.
            I use boiled potatoes in many recipes, and I had always boiled potatoes in my stovetop pressure cooker, and it did need some monitoring. But since I bought this little guy (instant pot), it made boiling potato far easy task. No supervision is required and no need to check if it's done or not. So with the Instant Pot, just set the time for 2 minutes and release the pressure manually and you are done. 
            So guys, skip buying that already made and ready to serve cheese balls from the store and prepare this homemade version, which is way better than store bought!

How to Make a Spinach-Cheese Balls

  • Cook spinach and potatoes in the instant pot for 2 minutes.
  • Drain water from spinach and grind cooked Spinach with ginger and green chilies.
  • Peel the potatoes skin and mash them.
  • In a bowl add mashed potatoes, spinach paste, bread crumbs, and salt and knead to make the dough.
  • In other bowl combine mozzarella cheese, sweet corn, red chili flakes, black pepper, and oregano and divide this into equal parts and roll to make small cheese stuffing balls.
  • Now grease hands with the oil and take a ball sized spinach-potato dough. Flatten by pressing gently.
  • Now place prepared cheese balls at the center and get the edges together. Seal well and roll a ball without cracks and freeze it for 15-20 minutes.
  • After 20 minutes, deep fry stuffed cheese balls until golden and crispy.

How long can it sit out?
  •         Because of the dairy ingredients used in this recipe and for food safety it should not be left sitting unrefrigerated for longer than 3-4 hours.

How Long Will it keep for?
  •          Prepare cheese stuffed spinach balls( raw /non-fried) and freeze in an airtight container up to 1 week. 


Preparation Time: 15 Minutes; Cooking Time: 15 Minutes.
Freezing Time: 15-20 Minutes.
Each Spinach Cheese Ball contains 70 Calories.

YouTube Video:


Ingredients:

  • To Prepare Spinach Dough:
    • Spinach 1 Cup
    • Potato 2, boiled and mashed
    • Bread crumbs 2 Tbsp
    • Salt ½ Tsp
    • Green chili 3 strips
    • Ginger paste 1 Tsp
  • To Make Cheese Stuffing:
    • Mozzarella cheese 1 cup
    • Sweet corn 3 Tbsp
    • Red chili flakes 1 Tsp 
    • Black pepper 1 Tsp
    • Oregano 1 Tsp
    • Oil for frying


Instructions:

  • To Cook Spinach-Potato in the Instant Pot:
    • Wash spinach leaves and add them into the pan and add 1 cup of water.
    • Cut potatoes into two parts and place them into the pan and add 1 cup of water.
    • Turn on instant pot and add 1 cup of water and place spinach and potatoes pans.
    • Close the lid and place the vent on sealing position and cook on manual mode (Hi) for 2 minutes.
    • Release pressure manually and open the lid.
    • Drain water from spinach and add to the blender jar or grinder and add green chilies, ginger and grind to make a fine paste.
    • Meanwhile, peel the skin of potatoes and mash them.
  • To Prepare Spinach-Potato Dough:
    • In a mixing bowl add mashed potatoes, spinach paste, bread crumbs, salt and knead to make the dough.
  • To Prepare Cheese Stuffing:
    • In a mixing bowl add mozzarella cheese, sweet corns, red chili flakes, black pepper, oregano and mix well.
    • Divide this into equal parts and roll to make small cheese stuffing balls.


  • To Prepare and Fry Cheese Balls:
    • Now grease hands with the oil and take a ball sized spinach-potato dough and flatten it by pressing gently.
    • Now place prepared cheese balls at the center and get the edges together and seal well.
    • Roll a ball without cracks, else the cheese will melt and burst out while frying or baking.
    • Similarly, prepare remaining balls and freeze it for 15-20 minutes.
    • After 30 minutes, deep fry stuffed cheese balls until golden and crispy.
  • Here, crispy, cheesy Spinach-Cheese Balls are ready to serve, serve hot with tomato sauce. Enjoy!!!

My Take: 

  • You can use cheddar cheese to this recipe instead of mozzarella cheese.
  • You can use garlic and onion powder into dough or stuffing for more flavors.

Dietary Comment :

  • The calorie count is based on a 2000 calorie diet.Per serving contains 70 calories, along with 6 g carbohydrates, 4.5 g fats, and 3 g protein.

Good Time To Eat:

  •            It's good to eat Spinach-Cheese Balls as an appetizer, snacks or starter.


If you make this recipe, share your food picture with hashtag #aaichisavali on Instagram and Facebook so everyone can enjoy it too!  Subscribe my YouTube channel for Healthy, Tasty, Instant Pot and Air fryer recipes. 


Eat Healthy, Stay Healthy!!!

Saturday, April 20, 2019

Hello Foodies,
           Indian style ground chicken curry, known as chicken keema, is a weekend brunch staple at most of the Indian houses. It serves hot out of the pan over slices of roasted masala butter pav or dinner rolls. This chicken keema got the flavor from garam masala, spiciness from green chilies and red chili powder. And as far as what to serve over toast on the weekend goes, it just can't be beaten. 


Ground chicken is relatively quick in cooking than other forms. Some of its best-known uses are in burgers, patties meatloaf and stuffing of samosas too. If you think of this keema curry as having peas and potatoes, that is indeed another common variation, keema-peas or keema-potatoes. So you can cook and serve this chicken keema with cooked rice or chapati(roti) at your next lunch or dinner table, and you'll be delighted to see your family wanting more. 
            Ground meat allows spices(Garam Masala) to penetrate in, resulting in an incredibly flavorful dish. Once you have added all masala and ground meat, you just need 4 minutes to cook. This plenty of flavor, easy to prepare a yummy meal for any night of the week. 


What is Keema?
            Ground or minced meat(chicken, mutton, lamb, beef, turkey meat) is known as Keema or Qeema. It is finely chopped meat by a grinder or a chopping knife.

How it's prepared?
              I have prepared it with ground chicken, which works really well. It's an easy dish to make and easy to spice up and down to taste. All you have to do is just soften the onion, tomatoes, green pepper, and then add in the spices and ground chicken. Close the lid and cook for 4 minutes and after a quick cook, it's ready to serve. Even you make a batch and then have some with roti, naan rice, or with other Indian dishes. So it's an easy way to prepare and a bit more interesting without too much work. 


How can we use this ground meat to prepare different dishes?
  • Prepare meatballs: which can be fried, baked or steamed
  • Can prepare Kebabs: can be cooked on a skewer or can be baked 
  • Burgers: can prepare Patties for burgers
  • Can prepare cutlets for yummy snacks
  • Can be added to flour to prepare meatloaves and baked.
  • Can be used as a stuffing for meat pies
  • Sandwiches: can be cooked with spices and serve on a bun to make sandwiches
  • Can be used as a stuffing for samosas or parathas.
Preparation Time: 10 Minutes; Cooking Time: 15 Minutes.
Each Serving of Chicken Keema Contains 260 Calories.

Video Recipe:

Ingredients:
  • Chicken Keema/Ground Chicken 250g
  • Onion 2 small, finely chopped
  • Tomato 3 small, finely chopped
  • Green paper 1 Cup, finely chopped
  • Butter 2 Tbsp
  • Veg. Oil 1 Tsp
  • Green Chillies 3 Strips, finely chopped
  • Ginger garlic paste 1 tbsp
  • Cumin seeds 1 Tsp
  • Bay leaf 1
  • Cinnamon 1 inch
  • Red chili powder 1 Tbsp
  • Turmeric 1 Tsp
  • Coriander powder 1 Tsp
  • Cumin Powder 1 Tsp
  • Garam Masala 1 Tsp
  • Salt 1 Tsp
  • Lemon juice 1 Tbsp
  • Water ¼ Cup

Ingredients:
To Prepare Chicken Keema in the Instant Pot:
  • Turn on the instant pot saute mode and heat butter.
  • Splutter cumin seeds, bay leaf, cinnamon sticks.
  • Add onion and saute and cook for 2-3 minutes.
  • Now add green pepper, green chilies, ginger garlic paste and cook for 1-2 minutes.
  • Add tomatoes and cook for a minute.
  • Now add red chili powder, turmeric, coriander-cumin powder, and salt and mix well.
  • Add ground chicken/keema and mix well and add water ½ Cup.
  • Close the lid and place the vent on the sealing position and cook on manual mode(Hi) for 3 minutes.
  • NPR for 5 minutes and then release the remaining pressure manually.
  • Open the lid and turn on saute mode and cook for 2-3 minutes.
  • Here, spicy, tasty chicken keema is ready to serve, serve this chicken keema with masala pav. Enjoy!!!

To Prepare Butter-Masala Pav:
  • Heat ½ Tsp butter in a pan, add some red chili powder and coriander leaves and stir.
  • Roast/Toast pav/ dinner slices and they are ready to serve.


To Serve Chicken Keema Pav:
  • Serve Chicken Keema with masala pav(dinner rolls).
  • Take pav slice to fill with chicken keema, then add finely chopped onions, coriander leaves and enjoy the tasty treat. Enjoy!!!

Dietary Comment:
  • The calorie count is based on a 2000 calorie diet.
  • Per serving contains 260 calories, along with 13.28 g carbohydrates, 2.25 g dietary fiber, 5.9 g fats, and 21.8 g protein.

Health Benefits of Chicken Keema:
  • Chicken Keema is one of the low carb and high protein dish.
  • Weight loss: Diets with high levels of protein have been known to be effective in reducing weight and chicken has been one of the main contenders in weight loss, since it provides high protein content. 
  • Heart Health: Homocysteine is an amino acid that can cause cardiovascular disease if levels are high in the body, eating chicken breast suppresses and controls homocysteine levels.
  • Bone and Teeth Health: chicken is also rich in phosphorus, an essential mineral that supports your teeth and bones, as well as kidney, liver, and central nervous system function.
Good Time To Eat:
            It's good to eat Chicken Keema for lunch, brunch, or for dinner.

Eat Healthy, Stay Healthy!!!


Thursday, April 18, 2019

Hello Foodies,
          This spicy, tangy and non-greasy tomato curry (tomato saar) is my favorite Indian curry recipe. It tastes great with simple plain rice. This instant, simple Maharashtrian Style meal, tomato saar/curry is prepared with tomatoes, coconut milk, green chilies, and peanuts powder. This is a straightforward tomato curry recipe that can be prepared even by a beginner. Tomatoes blend very well with spices and other vegetables. To balance tomatoes tangy taste, I always use a bit of jaggery (or sugar) in tomato recipes. To make this tomato saar always use ripe, red tomatoes. Also, this is no onion, no garlic recipe. When you use the instant pot to prepare a meal, it's ready in a few minutes and a lot easier way and hustles free. What's great about this tomato curry is that it's not greasy like other curries and with no added sugar. This recipe will give you about a liter of Curry. I like to keep mine fairly thin, so I can cook it further with other ingredients and not worry about it getting too thick. If you want yours thicker, just cook it longer. The convenience of using an Instant Pot and it’s now my go-to quick, perfect and easy dinner. This little kitchen appliance “Instant Pot,” has made my life so much easier. One pot, no watching, no having to stir. Just throw it all in, walk away and forget about it. It even keeps the food warm if you forget about it or aren’t ready to eat. 


This is why this Instant Pot Tomato Saar/Curry is my favorite:

  • It's tasty, soothing and flavourful.
  • It’s healthy and full of nutrients.
  • It's low in calories.
  • It’s so easy and quick to prepare.
  • It’s super thick and creamy.
  • It refrigerates well, and leftovers reheat perfectly.


Preparation Time: 15 Minutes; Cooking Time: 15 Minutes.
Each Serving of Tomato Saar/Curry Contains 100 Calories.

YouTube Video:


Ingredients:


  • Tomato 3, medium
  • Coconut milk ½ Cup(100 ml)
  • Green chilies 5 strips
  • Ginger paste 1 Tsp
  • Peanut Powder 2 Tbsp(dry roasted peanuts)
  • Jaggery / Sugar  1 Tsp
  • Cumin Powder 1 Tsp
  • Salt 1 Tsp
  • Rice 1 Cup + Salt ½ Tsp
  • Water as needed


To Temper :


  • Cumin seeds 1 Tsp
  • Cinnamon 1” stick
  • Bay leaf 1
  • Ghee/oil 2 Tbsp


Instructions:


  • Clean and wash rice and add 1 ½ cup of water and salt ½ Tsp
  • Wash tomatoes and make a cross incision and keep aside.
  • In a pan add 1 cup of water, peanuts powder, jaggery, green chilies, ginger paste, and tomatoes.
  • Turn on Instant pot and add 2 Cups of water and place tomato and rice pan(remember always keep rice pan above the lentils or veggies pan).
  • Close the lid and place the vent on sealing position and cook on manual mode (Hi) for 6 minutes.
  • NPR for 5 minutes and then release the remaining pressure manually.
  • Peel the skin of tomatoes and grind to make fine or puree and sieve or strain grinded paste.
  • Turn on Saute mode of Instant pot and heat butter or oil.
  • Splutter cumin seeds, bay leaf, and cinnamon stick.
  • Now add prepared tomato paste, coconut milk, cumin powder, and salt and mix well.
  • Stir and cook for 2-3 minutes, and tomato saar/curry is ready to serve.
  • This tangy, spicy and straightforward tomato saar taste good with plain rice. Enjoy!!


My Take:


  • To prepare Vegan Tomato Curry/Saar just replace ghee by adding oil or vegan butter.
  • Adjust the thickness of Curry by adding more or less water.
  • If you like more spicy Curry, then add more green chilies.

Dietary Comments:


  •     The calorie count is based on a 2000 calorie diet.
  •     Per serving contains 100 calories, along with 7.11 g carbohydrates, 1.6 g dietary fiber, 8.16 g fats, and 2.2 g protein.

Health Benefits of Tomato Saar / Curry:


  • Tomatoes contain a good amount of calcium and vitamin K and help to maintain strong bones.
  • It provides essential antioxidants.
  • Tomatoes are good for your heart.
  • Vitamin B and potassium in tomatoes, they are effective in reducing cholesterol levels and lowering blood pressure. 
  • Tomato saar is packed with all the healthy nutrients. 

Good Time To Eat:


  •             It is good to eat tomato saar/curry for lunch as well as for dinner.


Eat Healthy, Stay Healthy!!!