Wednesday, July 31, 2019

Hello Foodies,
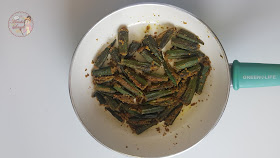
          Dinner can be ready in less than 30 minutes with this quick and easy stuffed bhindi/okra fry recipe. I have prepared stuffed bhindi fry in the air fryer and on the stovetop and the results are almost the same. But the stovetop method requires a little bit more oil and air fryer does not. Cooking your vegetables in the air fryer gives you a result similar to roasting, but slightly crispier on the outside. So today I’m walking you through how to cook okra in the air fryer and on the stovetop.


So the dinner or lunch mealtime can be the very least of your worries because this flavourful dish is made in just 25 minutes. So no need to spend hours in the kitchen cooking dinner after an exhausting day. If that all sounds way too good to be true, just wait until you see speedy, easy spins on some of your favorite meal with this simple recipe. This air fryer stuffed okra fry recipe is perfect as a main course or side dish. Perfectly stuffed, cooked, and tasty okra/bharwa bhindi dish.

YouTube Video:


               This stuffed okra/ Bharwa bhindi exists in different names. It consists of hollowed or halved okra(Bhindi), filled with any of a variety of fillings, often including spices, coconut, peanuts, and flour. Everyone has their own way to prepare this stuffed okra. They are usually assembled by filling the cavities of the okra and then cooking. Bhindi or okra is mild in taste and thus is a good choice for stuffing and giving it a spicy twist. If you prefer you can make this dish using dry roasted chickpeas flour instead of peanuts and coconut which lends it a characteristic taste. Okra is low in saturated fat and very low in cholesterol and sodium. Additionally, it is a good source of protein, iron, phosphorus, zinc and copper, dietary fibers, vitamins & other minerals. So try this Bharwa Bhindi and enjoy delicious vegetarian side dish. 


This Stuffed Bhindi(Okra) Fry is:
  • Healthy and tasty.
  • Easy to make 
  • Vegan + Gluten-free
  • Can be made in an air fryer and over the Stovetop too
  • Pairs well with Chapati, Roti or with Phulka
  • Tiffin Box(Lunchbox) Recipe
  • Needs less oil.
More Okra/Bhindi Recipes:
Preparation Time: 15 Minutes; Cooking Time: 10 Minutes.
Each Serving of Stuffed Bhindi Contains 125 Cal.


Ingredients:
  • Bhindi / Okra 250g
  • Peanuts 3 Tbsp
  • Coconut Fresh, grated 3 Tbsp
  • Red Chili powder 1 Tbsp
  • Coriander powder 1 Tsp
  • Cumin powder 1 Tsp
  • Goda Masala/Garam Masala 1 Tsp
  • Turmeric 1 Tsp
  • Salt 1 Tsp
  • Coriander Leaves 2 Tbsp, Chopped
  • Veg.Oil 3 Tsp


Instructions :
To Make Stuffing/Masala:
  • In a grinder add peanuts powder, coconut grated, turmeric powder, goda masala, cumin-coriander powder, salt, coriander leaves and grind all to make stuffing (make a coarse paste).


To cut and stuff the Bhindi/Okra:
  • Wash the Bhindi/Okra thoroughly and pat dry them using a paper towel.
  • Cut off both ends of the bhindi and then cut them into half.
  • Now, make a cut in each part lengthwise without cutting through the entire length(They should still be joint at one end).
  • Similarly, do this with every bhindi and stuff the grounded masala into the incision evenly.


To Make Stuffed Bhindi(Okra) in Air Fryer:
  • Grease pan with oil and preheat air fryer for 3 minutes at 350 F.
  • Transfer the stuffed Bhindi into the pan and arrange then into a single layer.
  • Insert the pan and air fry for 10 minutes at 350 f and flip them after 5 minutes.
  • Here, tasty stuffed bhindi/okra is ready to serve, serve hot with chapatis, bhakri, or with rice as a side dish


Dietary Comment :
  • The calorie count is based on a 2000 calorie diet.
  • Per serving contains 125 calories, along with 10.4 g carbohydrates, 4.9 g dietary fiber, 8 g fats, and 5 g protein.
  • Portion size can always be increased or decreased depending on your health goals and activity level. 


To Make Stuffed Bhindi(Okra) in Pan over the Stovetop:
  • Heat oil in a pan, and arrange the stuffed Bhindi into a single layer.
  • Cook on medium to low flame for 7-8 minutes or until it becomes brown.
  • Stir and flip after every 1-2 minutes.
  • Here tasty stuffed bhindi/okra is ready to serve, serve hot with chapatis, bhakri, or with rice as a side dish. Enjoy!!!
Dietary Comment :
  • The calorie count is based on a 2000 calorie diet.
  • Per serving contains 154 calories, along with 10.4 g carbohydrates, 4.9 g dietary fiber, 11.41 g fats, and 5 g protein.
  • Portion size can always be increased or decreased depending on your health goals and activity level. 


Tips to Make Non-Sticky Stuffed Bhindi Fry:
  • You have to keep turning the bhindi after every 2-3 minutes.
  • If you place stuffed bhindi all over each other, they won’t get cooked evenly.
  • You have to cook it on medium to low flame, if you cook it on high flame, the bhindi will get brown quickly but it won’t get cooked.

Good Time To Eat:
            It is good to eat stuffed bhindi fry for lunch, brunch or dinner.

  • If you make this recipe, share your food picture with hashtag #aaichisavali on Instagram and Facebook, so everyone can enjoy it too! 
  • Subscribe to my YouTube channel for Healthy, Tasty, Instant Pot and Air fryer recipes.
Eat Healthy, Stay Healthy!!!

Tuesday, July 30, 2019

Hello Foodies,
          I have been using Black & Decker Crisp N' Bake Convection Air Fry Countertop Oven for a couple of months and have been consistently impressed with how quickly they heat up food. But unlike a microwave, my food does not come out deformed or rubbery. I appreciate its simplicity and ease of use. I tried to make everything in it besides toast: baked scones, bread loaf, biscuits. I will share the recipes soon. 


I like it for reheating pizza too! So today here I am sharing my Indian flatbread kulcha recipe. This kulcha is made using whole wheat flour, stuffed with potato-spices stuffing and cooked in black n decker countertop oven. They came out crispy and scrumptious. 


Homemade Crispy Amritsari Aloo Kulcha Without Oven

Video Recipe:


           This whole wheat flour Amritsari aloo kulcha is one of the Indian flatbreads traditionally baked in a clay tandoor. Since we don't have a tandoor oven at home, so I have cooked it in the Black n Decker Convection oven. This stuffed kulcha is perfect for soaking up all the delicious Indian curries. I served my stuffed kulcha with paneer kadhai. In the preparation of this Amritsari Aloo Kulcha, I have not used onion and garlic, so its a no onion-no garlic recipe. If you like, you can add onion and garlic while preparing potato stuffing. So guys let's get started!


This Whole Wheat Amritsari Aloo Kulcha is:
  • No onion - no garlic recipe
  • Healthy and tasty.
  • Easy to make 
  • Vegetarian + Vegan
  • Can be made in the oven/air fryer/over the Stovetop too
  • Pairs well with any Indian curry.
  • No butter recipe
Ingredients:
To Prepare the Dough:
  • Whole Wheat flour 2 ½ Cups
  • Olive oil 2 Tbsp 
  • Sugar 2 Tsp 
  • Salt ½ Tsp
  • Instant Yeast 1 Tbsp
  • Kasuri Methi 1 Tsp
  • Water 1 ¼ Cup
To Prepare Potato Stuffing:
  • Potato 4, boiled and mashed 
  • Green chili 1, finely chopped
  • Ginger ½ Tsp, grated 
  • Red chili powder ½ Tbsp
  • Black pepper powder ½ Tsp 
  • Turmeric Powder ½ Tsp
  • Coriander Powder 1 Tsp 
  • Cumin Powder 1 Tsp 
  • Amchur or Dry Mango Powder / Chaat Masala 1 Tsp 
  • Coriander leaves 2 Tbsp, chopped 
  • Salt to taste
Instructions:
To Prepare Aloo Stuffing for Kulcha:

  • In a bowl add boiled and mashed potatoes, red chili powder, turmeric, coriander-cumin powder, black pepper, amchur powder, salt, green chilies, ginger paste, coriander leaves and mix well.


To Prepare the Dough:
  • Sieve the whole wheat flour(most important step).
  • Use the dough hook attachment of the kitchen aid and keep it ready and set the bowl of the kitchen aid mixer in position.
  • In a mixer bowl add water 1cup, sugar, yeast, olive oil, whole wheat flour, salt, and Kasuri methi.
  • Now, lock the hook knob and start the mixer at speed 2 first and keep alternating between speed 2 and speed 4 as the dough starts forming.
  • Stop the mixer and scrape the dry flour from the sides of the bowls using a spatula.
  • Start the mixer and add the remaining ¼ cup of water slowly, 2 Tbsp at a time in the bowl. 
  • Now, add oil to make the dough less sticky and keep mixing on low speed until dough forms.
  • Cover with cling wrap and keep aside for 1 hour.
To Prepare Kulcha:
  • After 60 minutes, place the dough and sprinkle some flour on the floor and start kneading the dough.
  • Divide the dough into 8 equal portions and roll to make dough balls. 
  • Take one dough ball and roll to 3-4 inch circular disk and place aloo stuffing in the center.
  • Take the edge and start pleating, bringing to the center.
  • Sprinkle some flour on the floor and gently roll the dough into 6-7 inch circle using fingers or you can use a rolling pin too.

To Cook Amritsari Aloo Kulcha In the Black n Decker Convection Oven and Air Fryer:
  • Spread some oil/butter over the pan.
  • Place the rolled kulcha on the pan and give it milk wash(milk wash is optional) and add chopped Coriander leaves.
  • Bake it in a convection oven at 400 F for about 10 minutes or until the top is golden brown in color.
  • Remove from the convection oven and spread some ghee on the top.
  • Healthy, Whole Wheat flour Amritsari Aloo Kulcha is ready to serve, serve them hot with mixed veg, chole, dal makhani, paneer kadhai or with curd. Enjoy!!!

My Take:
  • You can use baking powder instead of instant yeast.
  • I have used this Black and Decker Convection Oven to make the kulcha and KitchenAid Artisan Stand Mixer prepare the dough.
  • You can use milk instead of water to knead the dough.
  • You can use butter instead of olive oil as well.
Dietary Comment :
  • The calorie count is based on a 2000 calorie diet.
  • Per serving contains 214 calories, along with 39 g carbohydrates, 6.1 dietary fiber, 4.84 g fats, and 6.61 g protein.
  • Portion size can always be increased or decreased depending on your health goals and activity level. 

Good Time To Eat:
            It is good to eat Amritsari aloo kulcha for lunch, brunch, or for dinner.

  • If you make this recipe, share your food picture with hashtag #aaichisavali on Instagram and Facebook, so everyone can enjoy it too! 
  • Subscribe to my YouTube channel for Healthy, Tasty, Instant Pot, and Air fryer recipes.

Eat Healthy, Stay Healthy!!!

Hello Friends,
          Welcome to unboxing and review of Black & Decker Crisp N' Bake Convection Air Fry Countertop Oven. It's designed to cook faster. It's styled the way so we could cook a variety of foods in it. And it cooks them very well without all the grease. A couple of nights ago, I used the bake setting to cook whole wheat stuffed kulcha(Indian Flatbread). It came out crispy, tasty, and in 10 minutes.


     I just want to point to a couple of things, it has a cooking chart along with recipes for fries, chips, wings. However, there is one thing, the food at the back of the oven cooks way faster than near the front. So you have to rotate the pizza, or if toasting, turn the bread back to front. It is a versatile kitchen appliance and can be used as a toaster, air fryer, and an oven. It's a 16-pound unit, and it's lightweight. The device is big, I like the clean and transparent look of it and also the knobs. We can cook 12 inches pizza, almost 3-4-pound chicken and toast uptown 6 slices of bread.

YouTube Video:


           It has 2 heating elements on the bottom. It has a power indicator light that stays on while cooking/baking/toasting. Light only turns on with the door closed. Also, once the timer runs out, the unit will automatically turn off.  It has three rack positions, and that improve cooking flexibility, and four different functions allow you to cook everything from pizzas, toast, chicken wings and many more.


      Function Knob: to choose convection bake, warm, air fryer, toast. You can select one for whatever type of food you cook. 
      Time Knob: to set the timer for all functions, except for toast. The timer can be set up to 60 minutes.
       Toast Knob: is for toast, you can choose from light, medium, or dark shade(it's dedicated precision toast timer).
   

Racks:
It provides 3 racks/ trays, and its position gives you the flexibility to cook foods of any size.


      The air fryer is perfect, and it cooks things so quickly and crispy. I have used it a few times, but so far, I love it. We are a small family, so it's working out very well for us.


      Also, if you have any questions, you can ask in the comment box, and I hope this little review and update will help. 

Friday, July 26, 2019

Hello Foodies,
          Whole wheat chapatis are an everyday staple in my home, and I prepared at least two times in the day. Our day starts with eating this soft and healthy whole wheat flour flatbread. This is why the dough is made in bulk and can be used throughout the day. The perfectly round, smooth, fluffy and light Indian flatbread that can be consumed along with any curry and dal or one can make delicious frankie roll using it. 


            Whole wheat delivers a variety of important nutrients, including vitamins, minerals, protein, fiber, and other healthy plant compounds. This is why it is considered healthy when included in a daily diet. The secret behind soft chapatis or rotis lies in the dough, and here I am sharing some most essential tips and tricks to make perfect dough for chapatis. If you are kneading the dough by hand, then it will take 10-15 minutes, but in a stand mixer, it will be ready in 3 minutes.

YouTube Video:

Consistency of the dough:
The Dough should be:
  • Soft and pliable.
  • Should not stick to your hands or rolling pin when rolling them.

Benefits of a stand mixer to knead the dough:
  • Effortless
  • Time saver
  • Easier to clean
  • Can do a large batch in a stand mixer effortlessly


How to make dough and Chapati/Phulka/Roti Using KitchenAid Stand Mixer
            A whole wheat chapati, or phulka or roti, is made from dry whole wheat flour, salt(optional), water and oil and mix using the dough hook of the stand mixer knead the dough. The prepared dough is first divided into small rounds and then flattened into perfectly even rounds with the help of a rolling pin. Make it of even thickness from all around that will help to puff up the phulka. This flattened dough is then cooked on a stovetop using skillet or tawa. Chapatis/phulkas can be enjoyed with both vegetarian and non-vegetarian curries, or can even be eaten with stir fry veggies. It tastes best when they are paired with desi ghee(clarified butter). This is why the dough is prepared in bulk and can be used throughout the day. It is very versatile, and it can be used just like regular toast, or as a side to many dishes. 


Preparation and Cooking Time: 10 Minutes.


Ingredients:


Instructions:
To prepare the Dough In KitchenAid Stand Mixer:
  • Sieve the whole wheat flour(most important step).
  • Use the dough hook attachment of the kitchen aid and keep it ready and set the bowl of the kitchen aid machine in position.
  • In a mixer bowl add whole wheat flour, salt and water 1 cup.
  • Now, lock the hook knob and start the mixer at speed 2 first and keep alternating between speed 2 and speed 4 as the dough starts forming.
  • Stop the mixer and scrape the dry flour from the sides of the bowls using a spatula.
  • Start the mixer and add the remaining ¼ cup of water slowly, 2 Tbsp at a time in the bowl. 
  • Now, add oil to make the dough less sticky and keep mixing on low speed until dough forms.
  • Cover and rest the dough for 10 minutes in a bowl, and after 10 minutes, the dough is ready to make chapatis and phulkas. 


To Roll Phulka:
  • Divide the dough into equal parts and roll to make dough balls.
  • Now, roll the dough ball into the flour (so that it doesn’t stick to the rolling pin) and roll it gently in a circular motion to form a circular shape.
  • Make it of even thickness from all around that will help to puff up the phulka.


To Roast Phulka:
  • Heat tawa(skillet) and transfer the rolled dough(Phulka) and let it form a few air bubbles. 
  • After 30 seconds, turn the phulka and keep the tawa on a higher flame(roast from another side for 20 seconds).
  • Now, remove the tawa and keep the roasting grill(High heat) and transfer the phulka on the rack/grill.
  • Turn the roti once it puffs up and has few light brown spots.
  • Once done, remove puffed phulka from the grill(you can use a tong to remove it).
  • Apply some ghee(it's totally optional), but ghee will keep the phulka softer.
  • Soft and healthy whole wheat flour phulka are ready to serve, serve with any Indian curry. Enjoy!!!

My Take:
  • Don't worry, the mixer may vibrate a bit when you start the mixer, and this is normal.
  • I have added the remaining water at the end to collect all the dry flour from the bottom of the bowl.
  • It took around 3 to 5 minutes to form the dough completely.
  • Make sure to cover and set the dough for at least 10 minutes, before making rotis. It will help to make a soft chapati(relaxing the gluten helps make the dough pliable and produces better produce).
  • Cook the roti in a high flame without burning.
  • Phulka cooks faster, so avoid leaving it unattended for a long time.
  • If you make this recipe, share your food picture with hashtag #aaichisavali on Instagram and Facebook, so that everyone can enjoy it too! 
  • Subscribe to my YouTube channel for Healthy, Tasty, Instant Pot, and Air fryer recipes.
Eat Healthy, Stay Healthy!!!

Hello Friends,
         Welcome to unboxing and review of KitchenAid Artisan Series 5Qt Stand Mixer. This mixer is available in 20 colors, and I bought it in Empire Red. It is 26 lbs(approx.12kg), so you need to find a place for it on your kitchen countertop(you can't storing it and always pulling it out). The stand mixer comes with a  flat heater, dough hook, 6 wire whip(whisker), pouring shield and 5-quart stainless steel bowl. The included instruction manual has a speed control guide and accessory attachment guide(I have shared it below) and recipes. This stand mixer is so fantastic to bake with and make things with, it's so incredible. I can honestly say I love my stand mixer. I am using it all the time because it has all of these attachments and it's just really easy to use.


          To make cake batters, cookie dough, roti dough, and cake frostings, I have been using a hand mixer. But, a few days back McDreamy surprise me by gifting this brand new KitchenAid Artisan 5Qt Stand Mixer, and honestly, fellas mixing/whisking with a stand mixer is obviously so much easier on the arm and wrist, but also it can beat while I'm doing something else and saves lots of time. The color is absolutely gorgeous, and I was very excited to pull it out of the box. It has everything you want in your stand mixer - big stainless steel bowl, 3 paddle attachment(paddle, dough hook, and whisk), a powerful motor and absolutely reliable results. 


YouTube Video:


          You can also buy other attachments separately to use this mixer as a food processor, an ice cream maker, sausage stuffer, pasta maker, meat grinder, juicer, grain mill, fruit or vegetable strainer, and more. 


When we tested this mixer and its whisk attachment with eggless cake batter, we found that the KitchenAid managed to mix the ingredients together really very well. We were pleased with how quickly they were fully incorporated.


Using the stand mixer:

Wire whip Paddle:
         It mainly used to mix, mixtures that need air incorporated, such as sponge cakes, heavy cream, frostings, egg whites, and mayonnaise.
Dough Hook:
          It mainly used to mixing and kneading yeast doughs, like chapati/roti dough, buns, bread, and pizza dough.
Flat Beater: 
          It mainly used to mix normal to heavy mixtures, like cakes, creamed frostings, cookies, pie pastry, mashed potatoes.
Pouring Shield:
          It mainly used to avoid ingredients splashing out of the bowl when mixing as well as easily pour ingredients in the bowl while mixing.
Bowl:
        Place the bowl on the bowl clamping plate and gently turn it in a clockwise direction to lock it into place.
Speed Control:
         It mainly used to increase or decrease speed. Lift speed control lever slightly up as you move it across the settings in either direction.
Use speed 1 until Ingredients have been blended and then gradually increase to the desired speed.
Motorhead:
         To raise the motorhead, slide the locking lever to the unlock position and lift the motorhead. Once lifted slide the locking lever to the lock position to keep the motorhead up.


Attachment Hub:
                    It mainly used as a mixer (as a food processor, an ice cream maker, sausage stuffer, pasta maker, meat grinder, juicer, grain mill, fruit or vegetable strainer, and more). 

Beater Shaft:
           To attach the paddle, slip the accessory onto the beater shaft and press upward and turn counterclockwise to hook the paddle over the pin on the shaft.


           Also, I have decided to try out a glass bowl and other attachments with this unit, and I will put up that review soon so subscribe and stay tuned for that.